
- Access
- License
- Publication
- Contact
Version 0.0.1
See the following tables for the download links for the GrooveTransformer VST plugin.
| Operating System | Download Links |
| Windows | Download |
| MacOS (ARM) | Download |
| MacOS (Intel) | Download |
If you are a linux user, you can build the plugin from source.
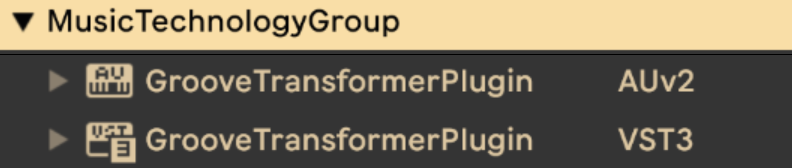
Locating the Plugin After Installation
Source Code
The plugin source code can be found here.
The plugin was developed using NeuralMidiFx, a wrapper we developed for streamlining the deployment of generative models within VST plugins.
The plugin and models are licensed separately. While the plugin is open source under GPLv3, the models are subject to additional non-commercial restrictions.
Plugin Source Code
Licensed under the GNU General Public License v3.0 (GPLv3).
Pre-trained Models (*.pt)
All pre-trained machine learning models included in this project are licensed under the Creative Commons Attribution-NonCommercial 4.0 International (CC BY-NC 4.0) license. You may use, share, and adapt these models for non-commercial purposes only.
To cite this work, please use the following BibTeX entries:
@inproceedings{Haki2024GrooveTransformer,
  author = {Evans, Nicholas and Haki, Behzad and Jorda, Sergi},
  booktitle = {Proceedings of the International Conference on New Interfaces for Musical Expression (NIME) 2024},
  year = {2024},
  month = sep,
  publisher = {NIME},
  title = {GrooveTransformer: A Generative Drum Sequencer Eurorack Module},
}
@phdthesis{Haki2025DesignDevelopmentDeployment,
    author = {Haki, Behzad},
    title = {Design, development, and deployment of real-time drum accompaniment systems},
    school = {Universitat Pompeu Fabra},
  year={2025},
}
Support, Bug Reports, and Feature Requests
Please use the GitHub Issues page.
Feedback, and Direct Contact
If you prefer to contact us directly, please contact Behzad Haki.
Collaborations
If you are interested in collaborating with us, please contact any of the authors.
- Overview
- Demo
- Documentation
- Showcases
- Hacking
What is the GrooveTransformer?
At it’s core, GrooveTransformer is
- a hybrid between a drum sequencer and an accompaniment generator,
- designed to be used for real-time live improvisation.
In other words,
the plugin is a sequencer that generates and playbacks drum loops in real-time,
using a combination of "programmed" drum patterns and also an incoming rhythmic pattern!
Story Behind the GrooveTransformer
The GrooveTransformer is very much inspired by the idea of rhythm spaces, that is, the idea of a space in which each point corresponds to a unique rhythm.
The most influential work for us was the Mutables Instruments’ Grids module.
This module is a drum sequencer that generates drum patterns in real-time, without requiring the user to program the patterns.
Instead, the module allows the user to navigate a 2D space of rhythms, where each point corresponds to a unique rhythm.
We wanted to take this idea further and create a plugin that allows the user to navigate a custom space, and also, allow the user to “program” the sequencer by specifying the rhythmic “feel” of the drum loop, rather than the exact pattern.
The last idea we had was to utilize rule based algorithms to allow for automatic navigation of the space (if the user desires).
These considerations would allow us to develop a system that would operate in a variety of ways:
- As a drum sequencer
- As an accompaniment generator
- Or as a hybrid of the two!
We speculated that such a system would afford the user the liberty of deciding where and how the system should be used!
How does it work?
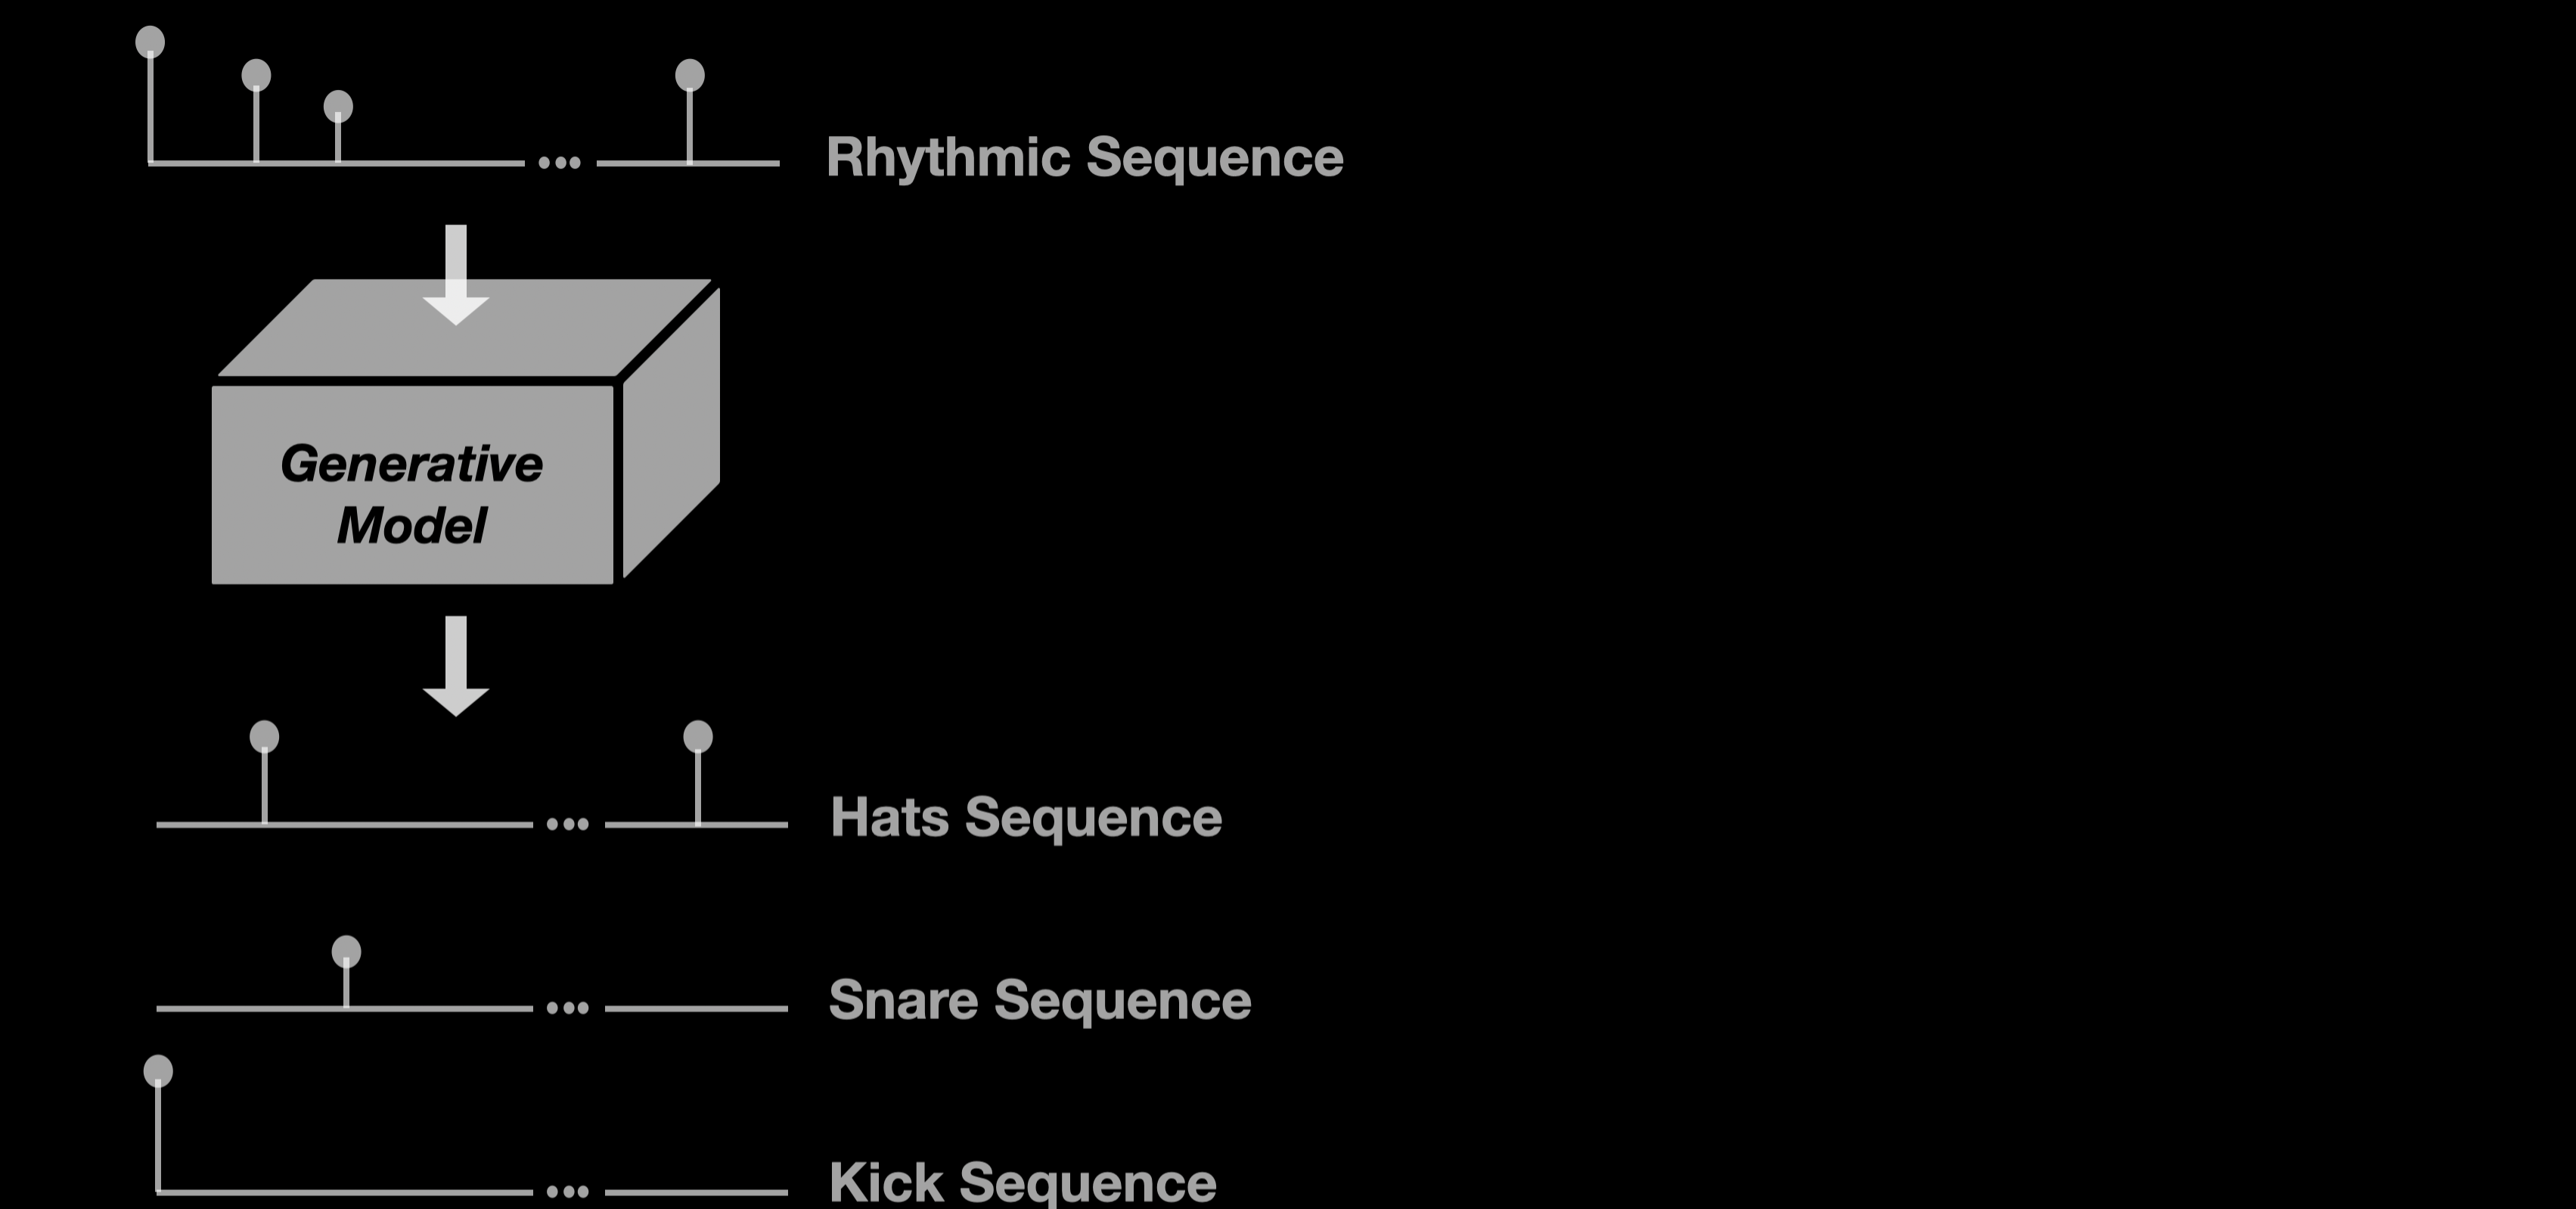
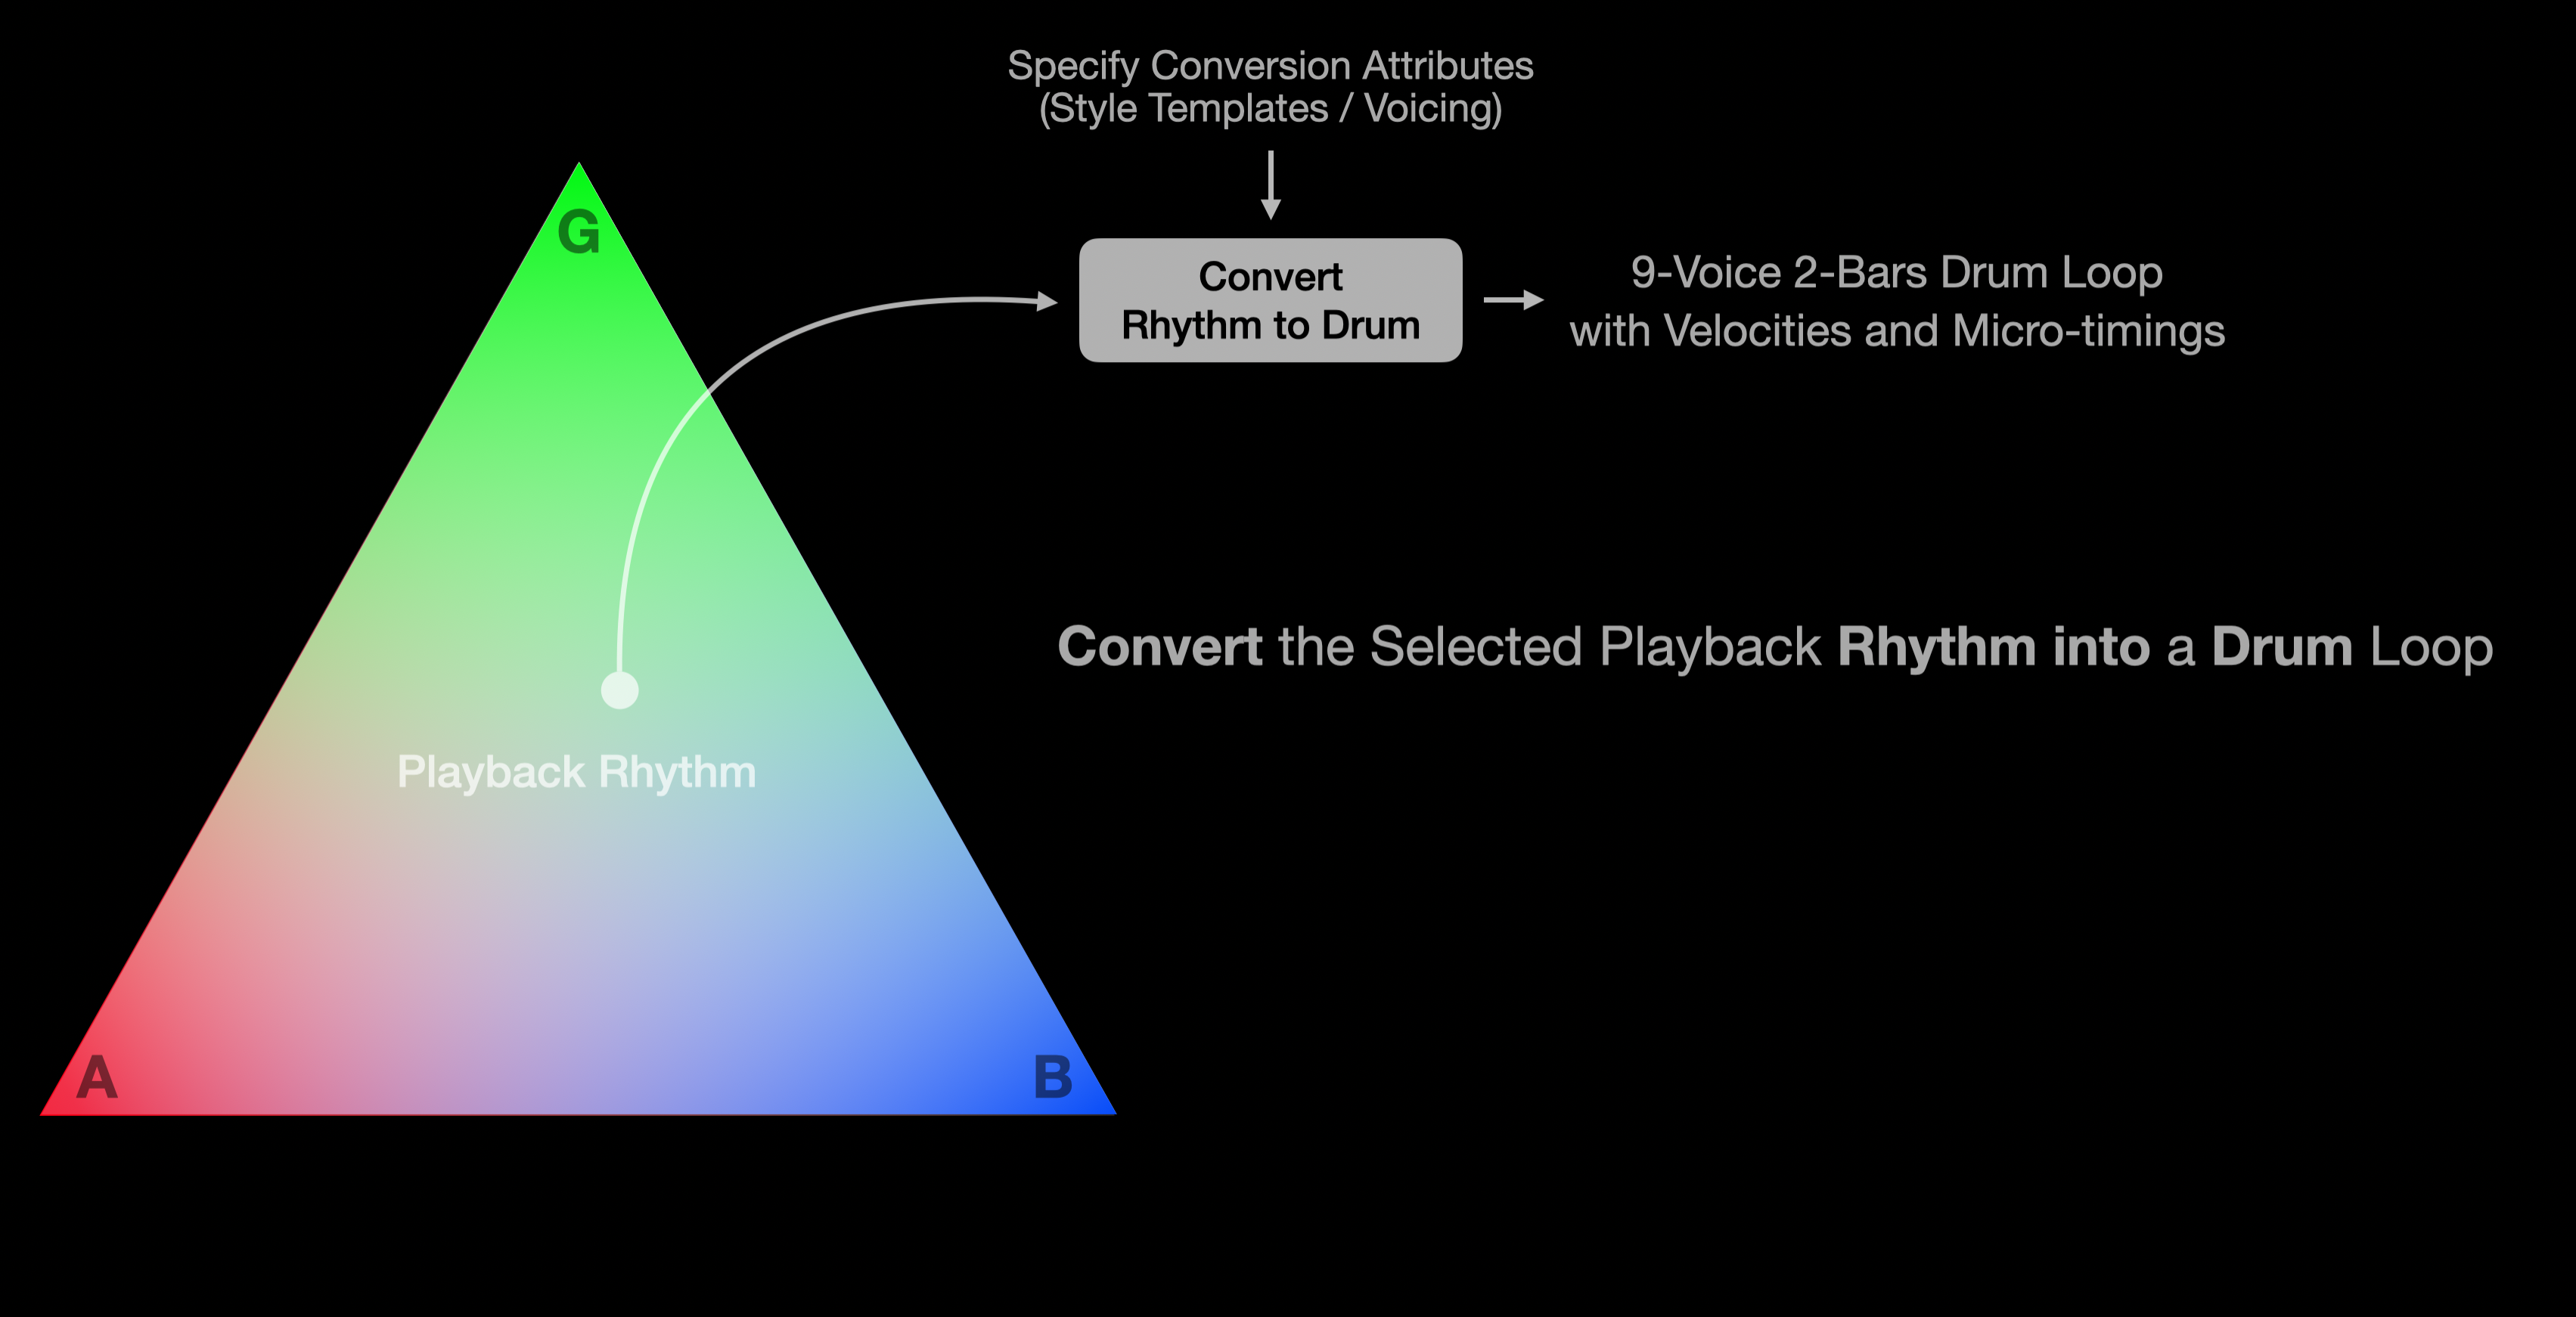
At the core of the plugin is a small generative neural network that is trained to convert a given rhythmic loop into a drum loop. Here by rhythmic loop we mean a pitch-agnostic sequence of note-on events, with exact timing and velocity.
Throughout the training process, the selected model attempts to create an abstract space in which each point (or rather region) corresponds to a unique pattern.
GrooveTransformer leverages this latent space to generate new drum loops in real-time.
Specifically, the plugin uses a “triangular” sub-space bounded by three rhythmic ideas:
- Two of which are user-defined
- The third is a rhythmic pattern received in real-time.
The plugin then generates drum loops that are dynamically varying within this space.
Let’s take closer look at the concept behind the plugin!
Generative Model
For the GrooveTransformer, we trained a generative neural network that would be able to expand a rhythmic pattern into a 9-voice drum loop.
Rhythmic patterns are in this case represented as a 1D sequence with micro-timing and velocity. That is, we specify on which steps (16th note grid) we want a drum hit, and also how hard the hit should be, and how much it should be offset from the grid.
The specific architecture of the neural network is not important for this discussion. What is important though is that beyond converting a rhythmic pattern into a drum loop, the network can also:
- randomly generate new drum loops without any rhythmic input,
- interpolate between two given drum loops!
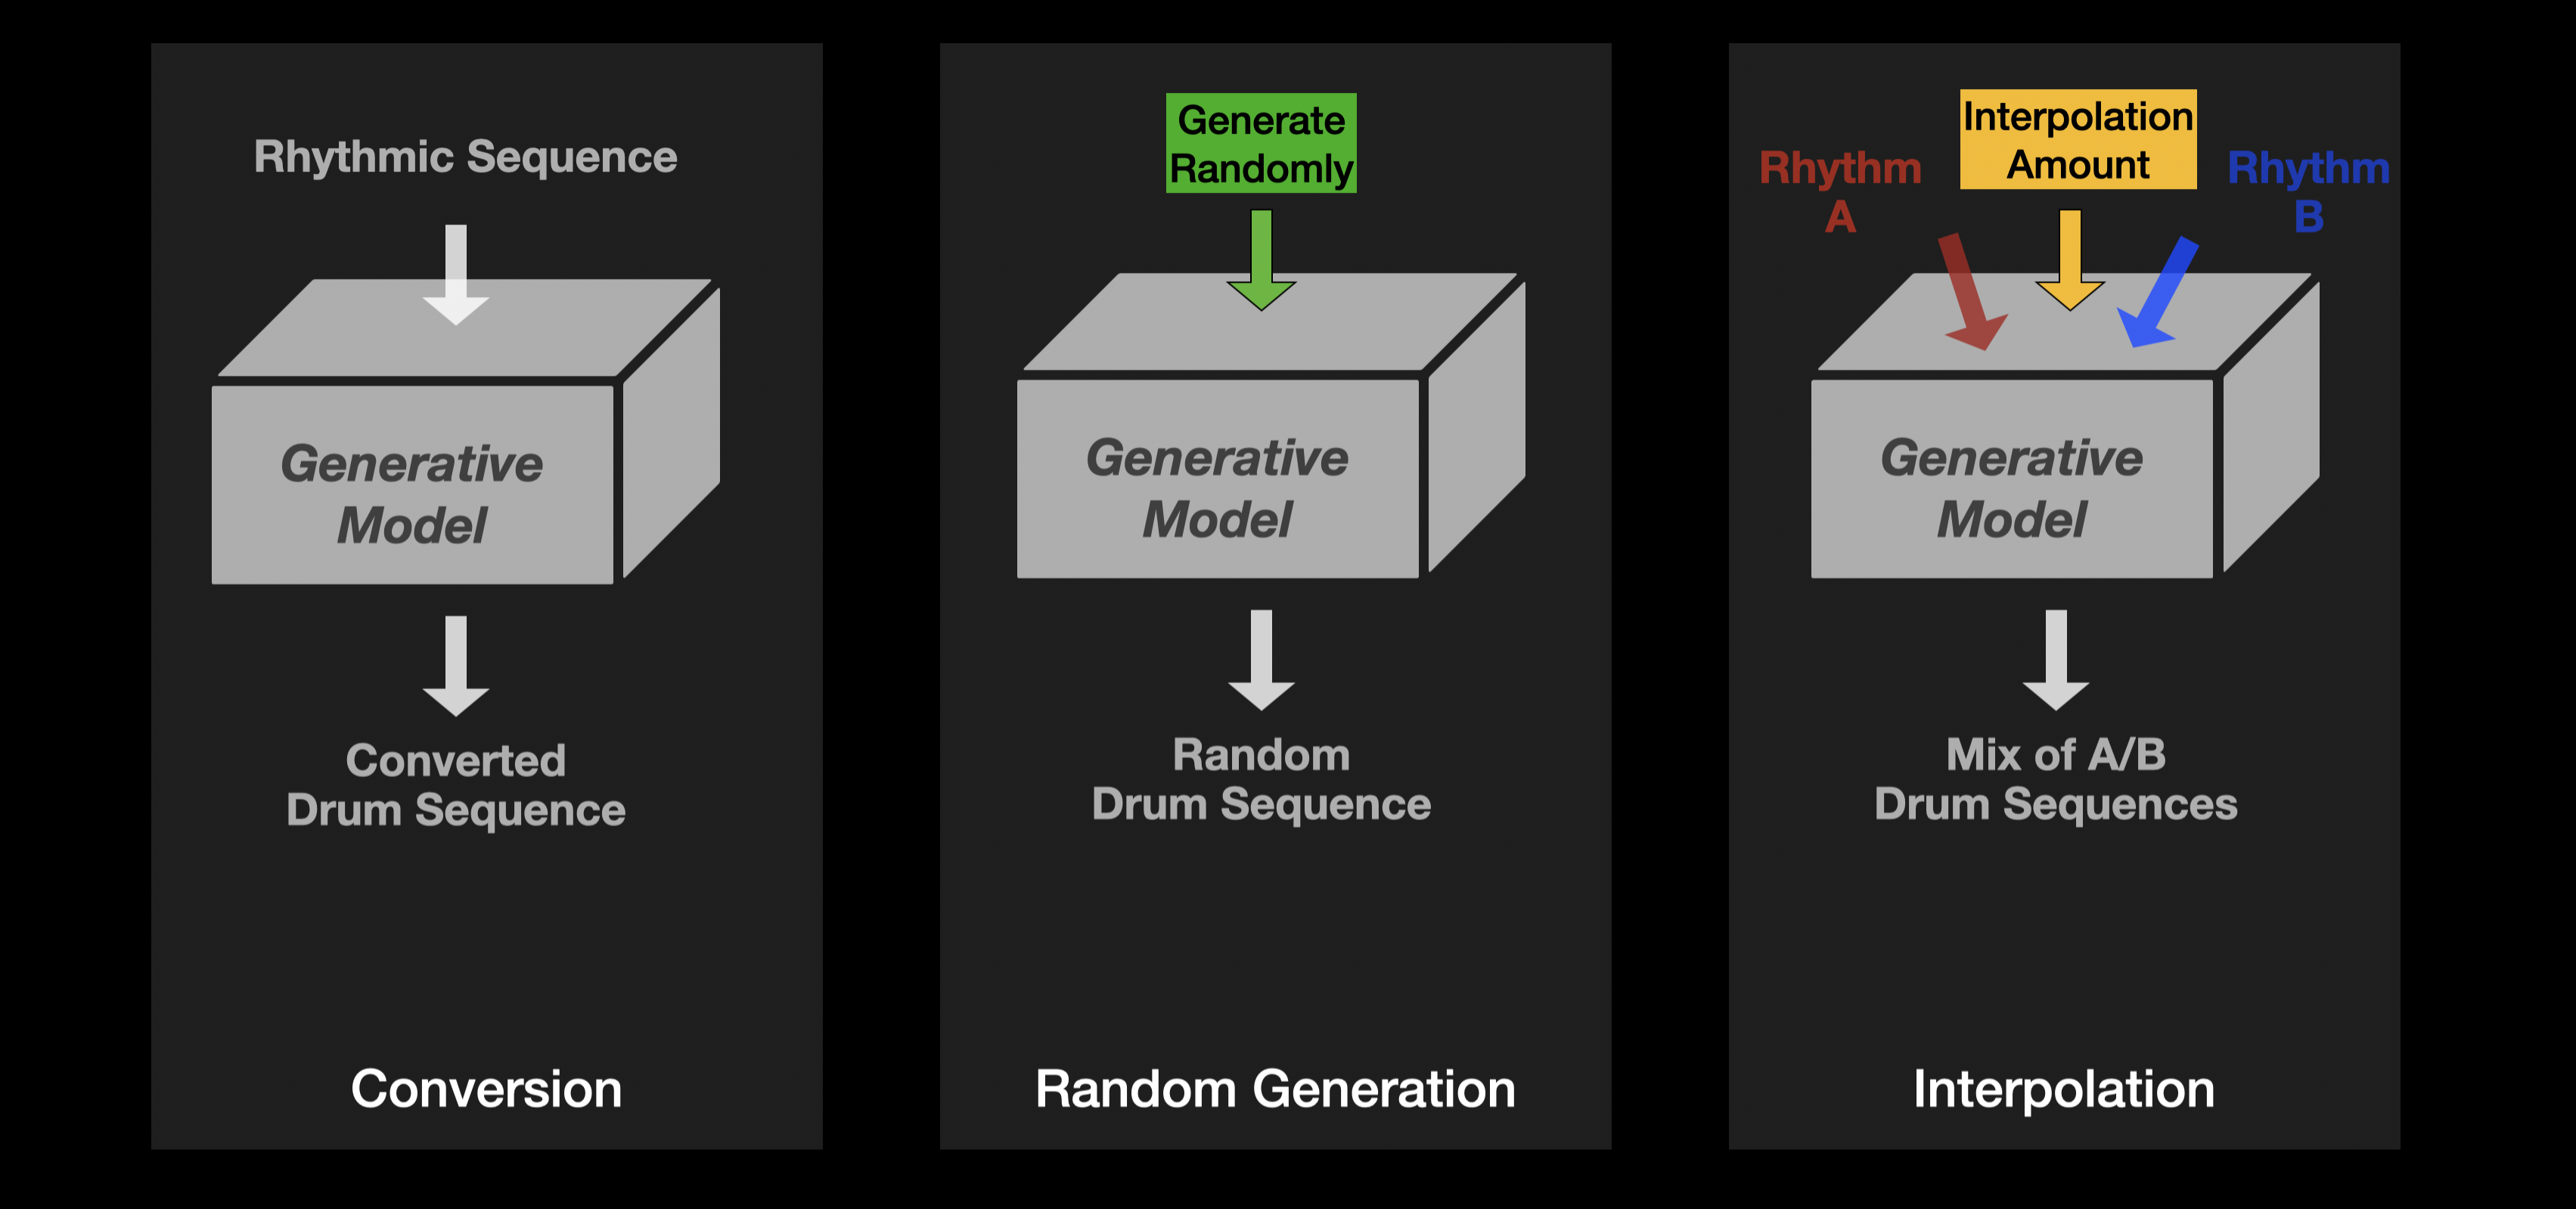
With these capabilities in mind, we can now consider how the plugin operates.
Exploiting Model Capabilities
Sequencing between Two Patterns
For the sake of simplicity, let’s consider we have two drum loops, A and B, and we want to generate a new pattern that is a mix of the two. In this case, we can use a slider to specify the degree to which the new pattern should resemble A or B.
In this case, patterns A and B can be programmed by the user utilizing a rhythmic seed, or they can be obtained by randomization.
Interpolating between these two patterns, allows for a smooth transition between them, hence, during live performance, the user can navigate the space of rhythms in between A and B.
In other words, in this case, the system would work as a sequencer! A sequencer that is ofcourse programmed in a very different way than traditional sequencers!

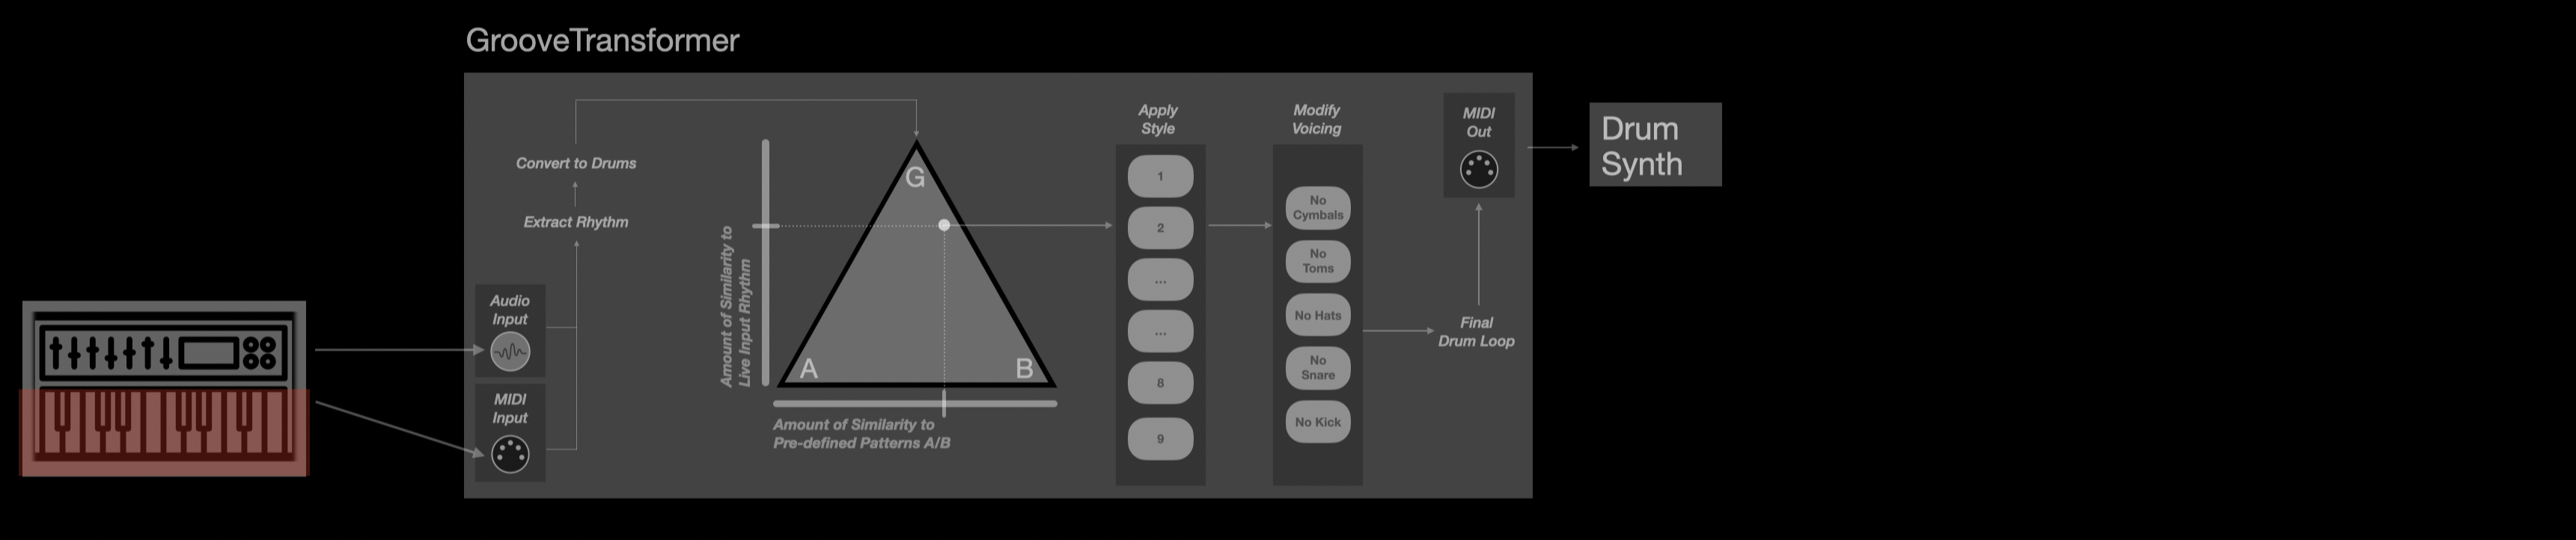
Reacting to a Live Rhythmic Source
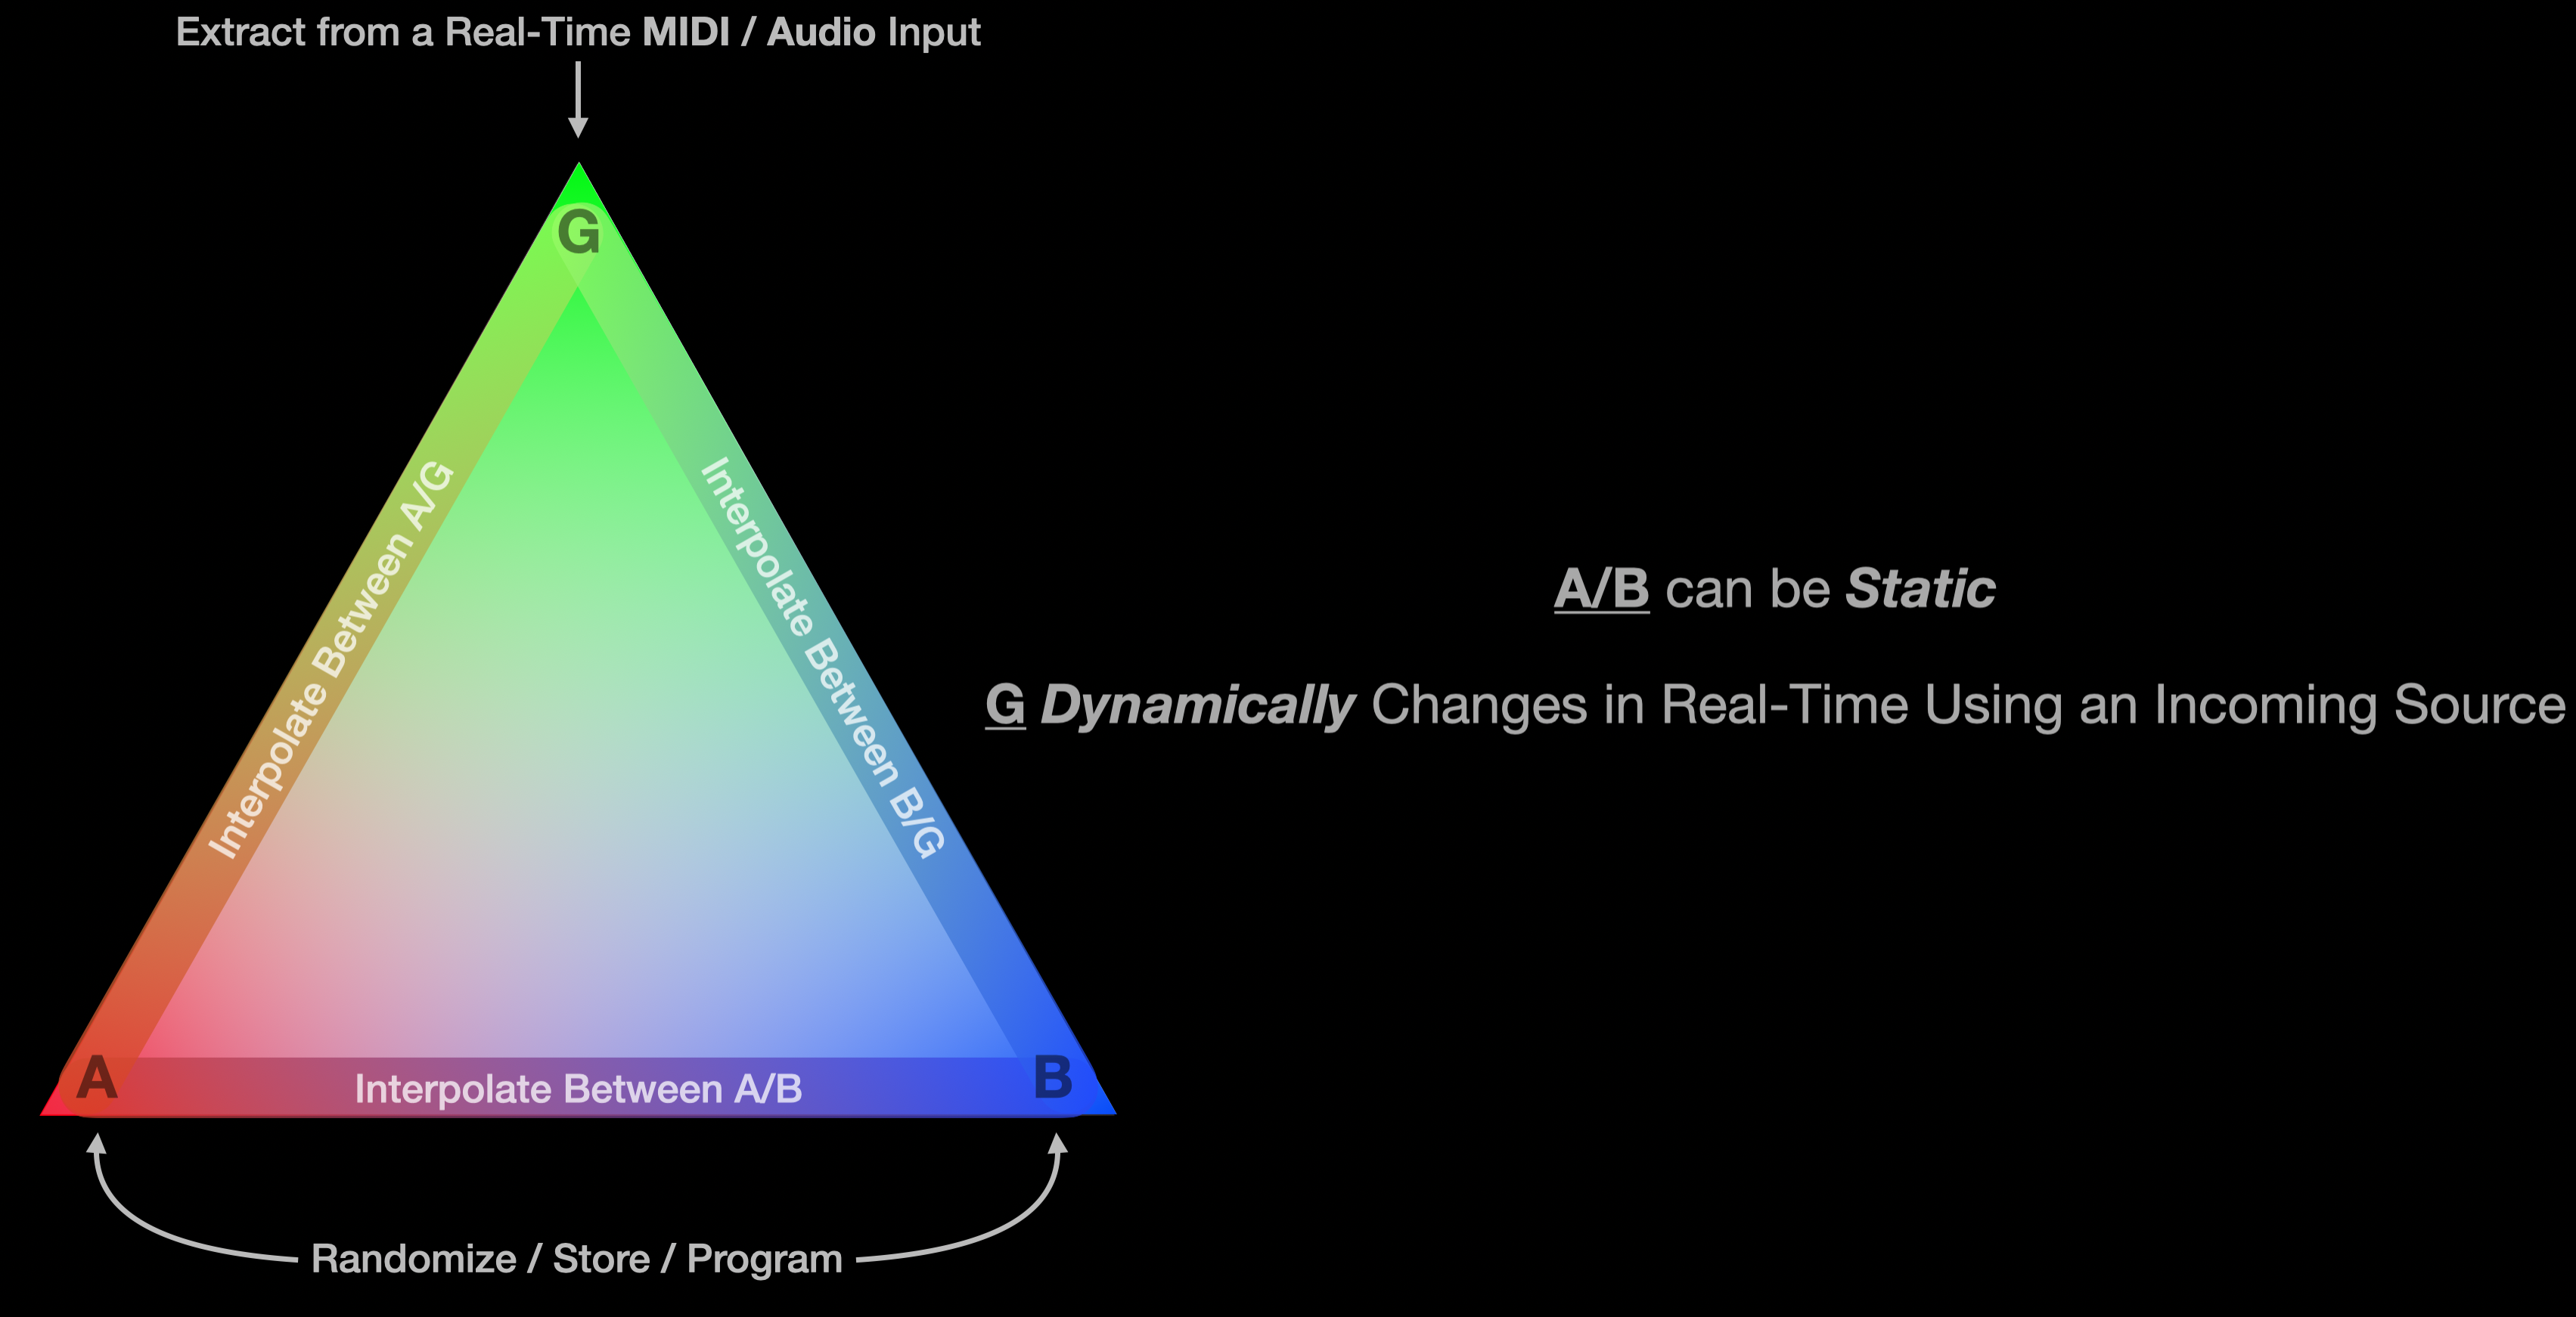
While operating in this mode is interesting, we can take this idea further by introducing a third pattern, G, which is obtained from an incoming rhythmic pattern in real-time.
This means that not only can we interpolate between A and B which are most-likely pre-programmed, but also we can use a rhythmic pattern that dynamically changes during the performance.
Hence, the system can also accompany an incoming rhythmic pattern!
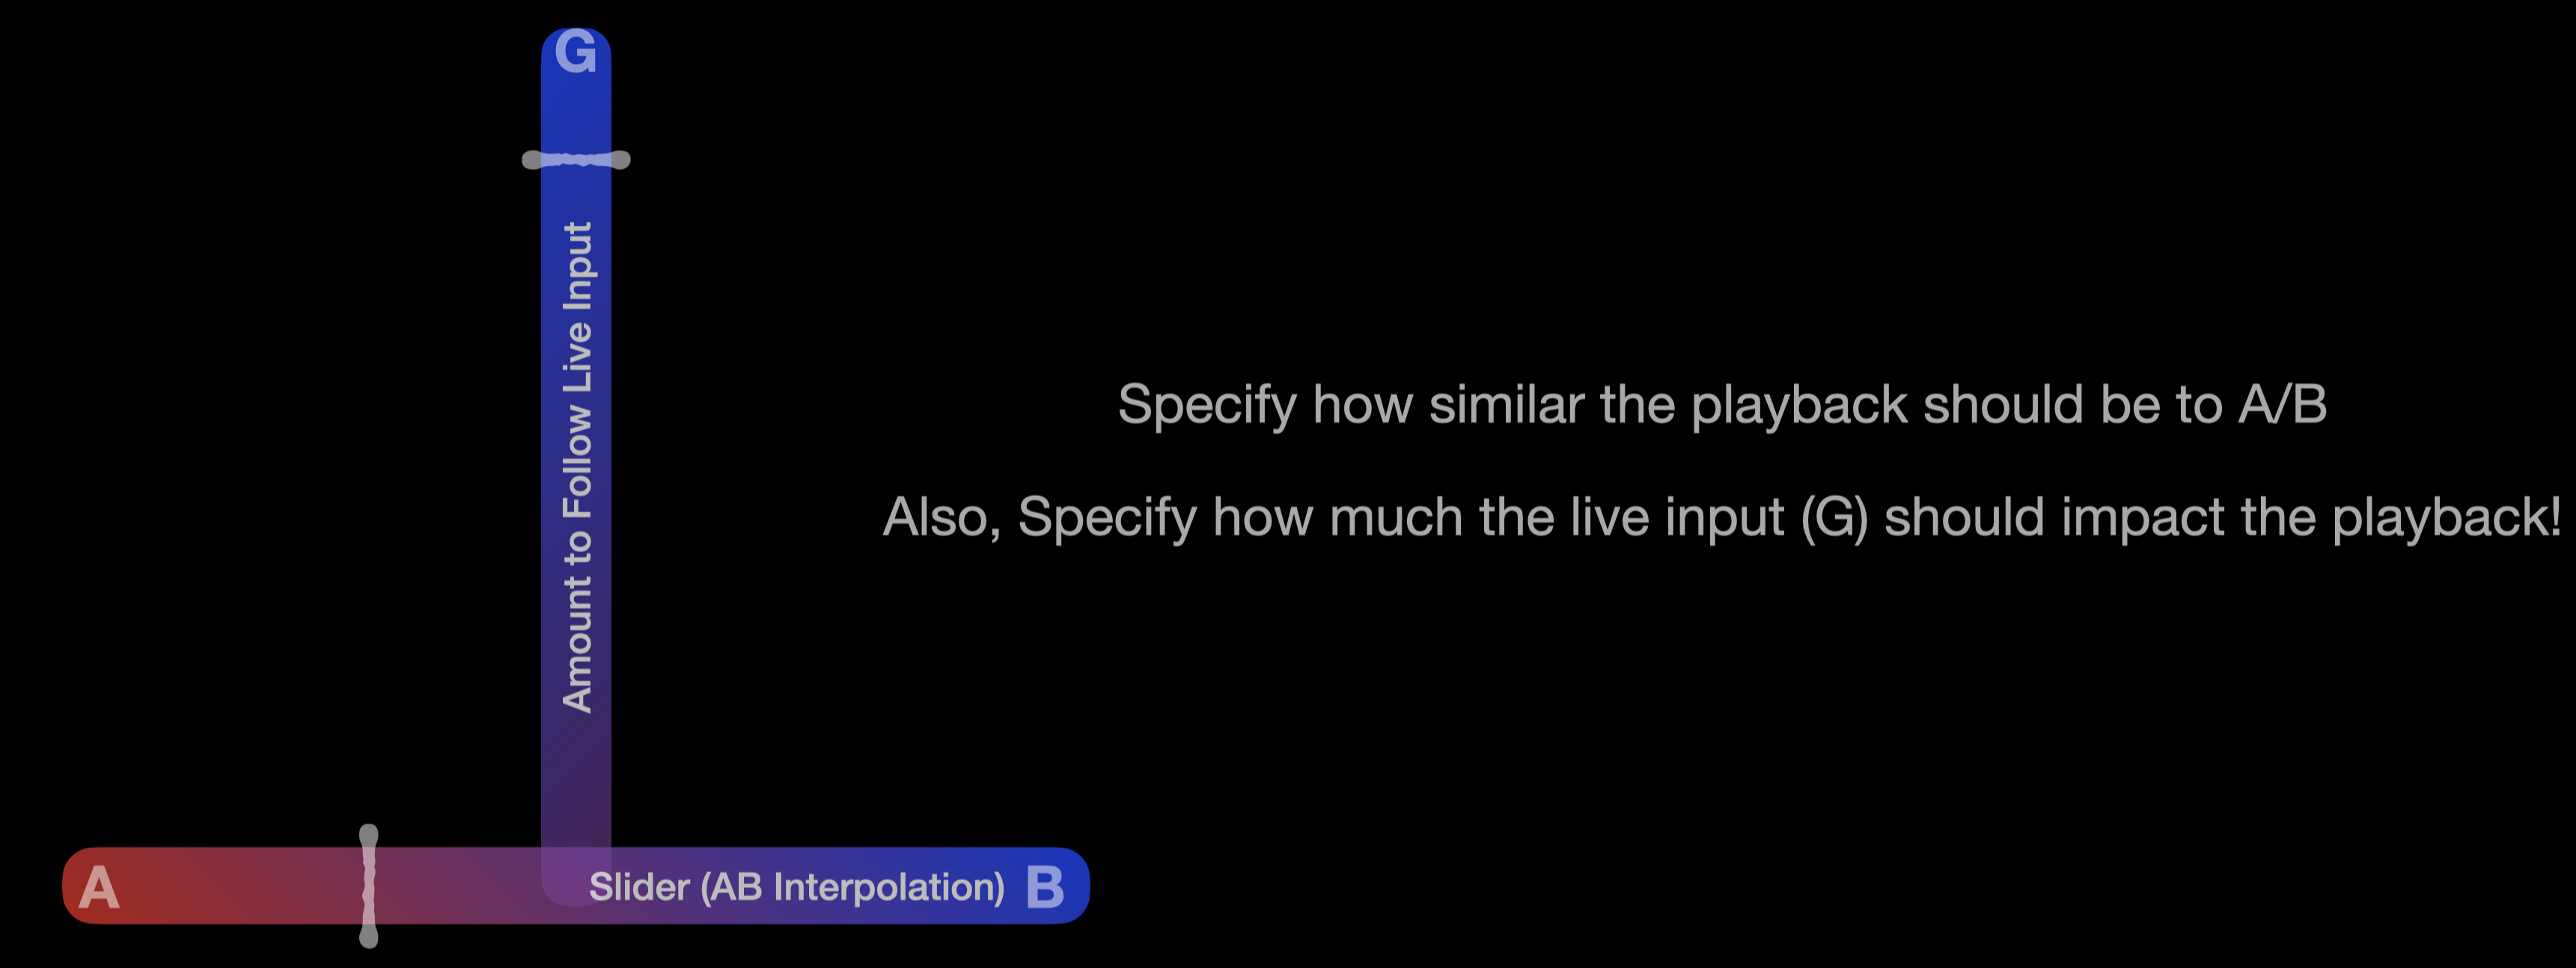
The best way to think about this is that the system can playback pre-programmed patterns, while also adapting the playback to a live rhythmic source in real-time.
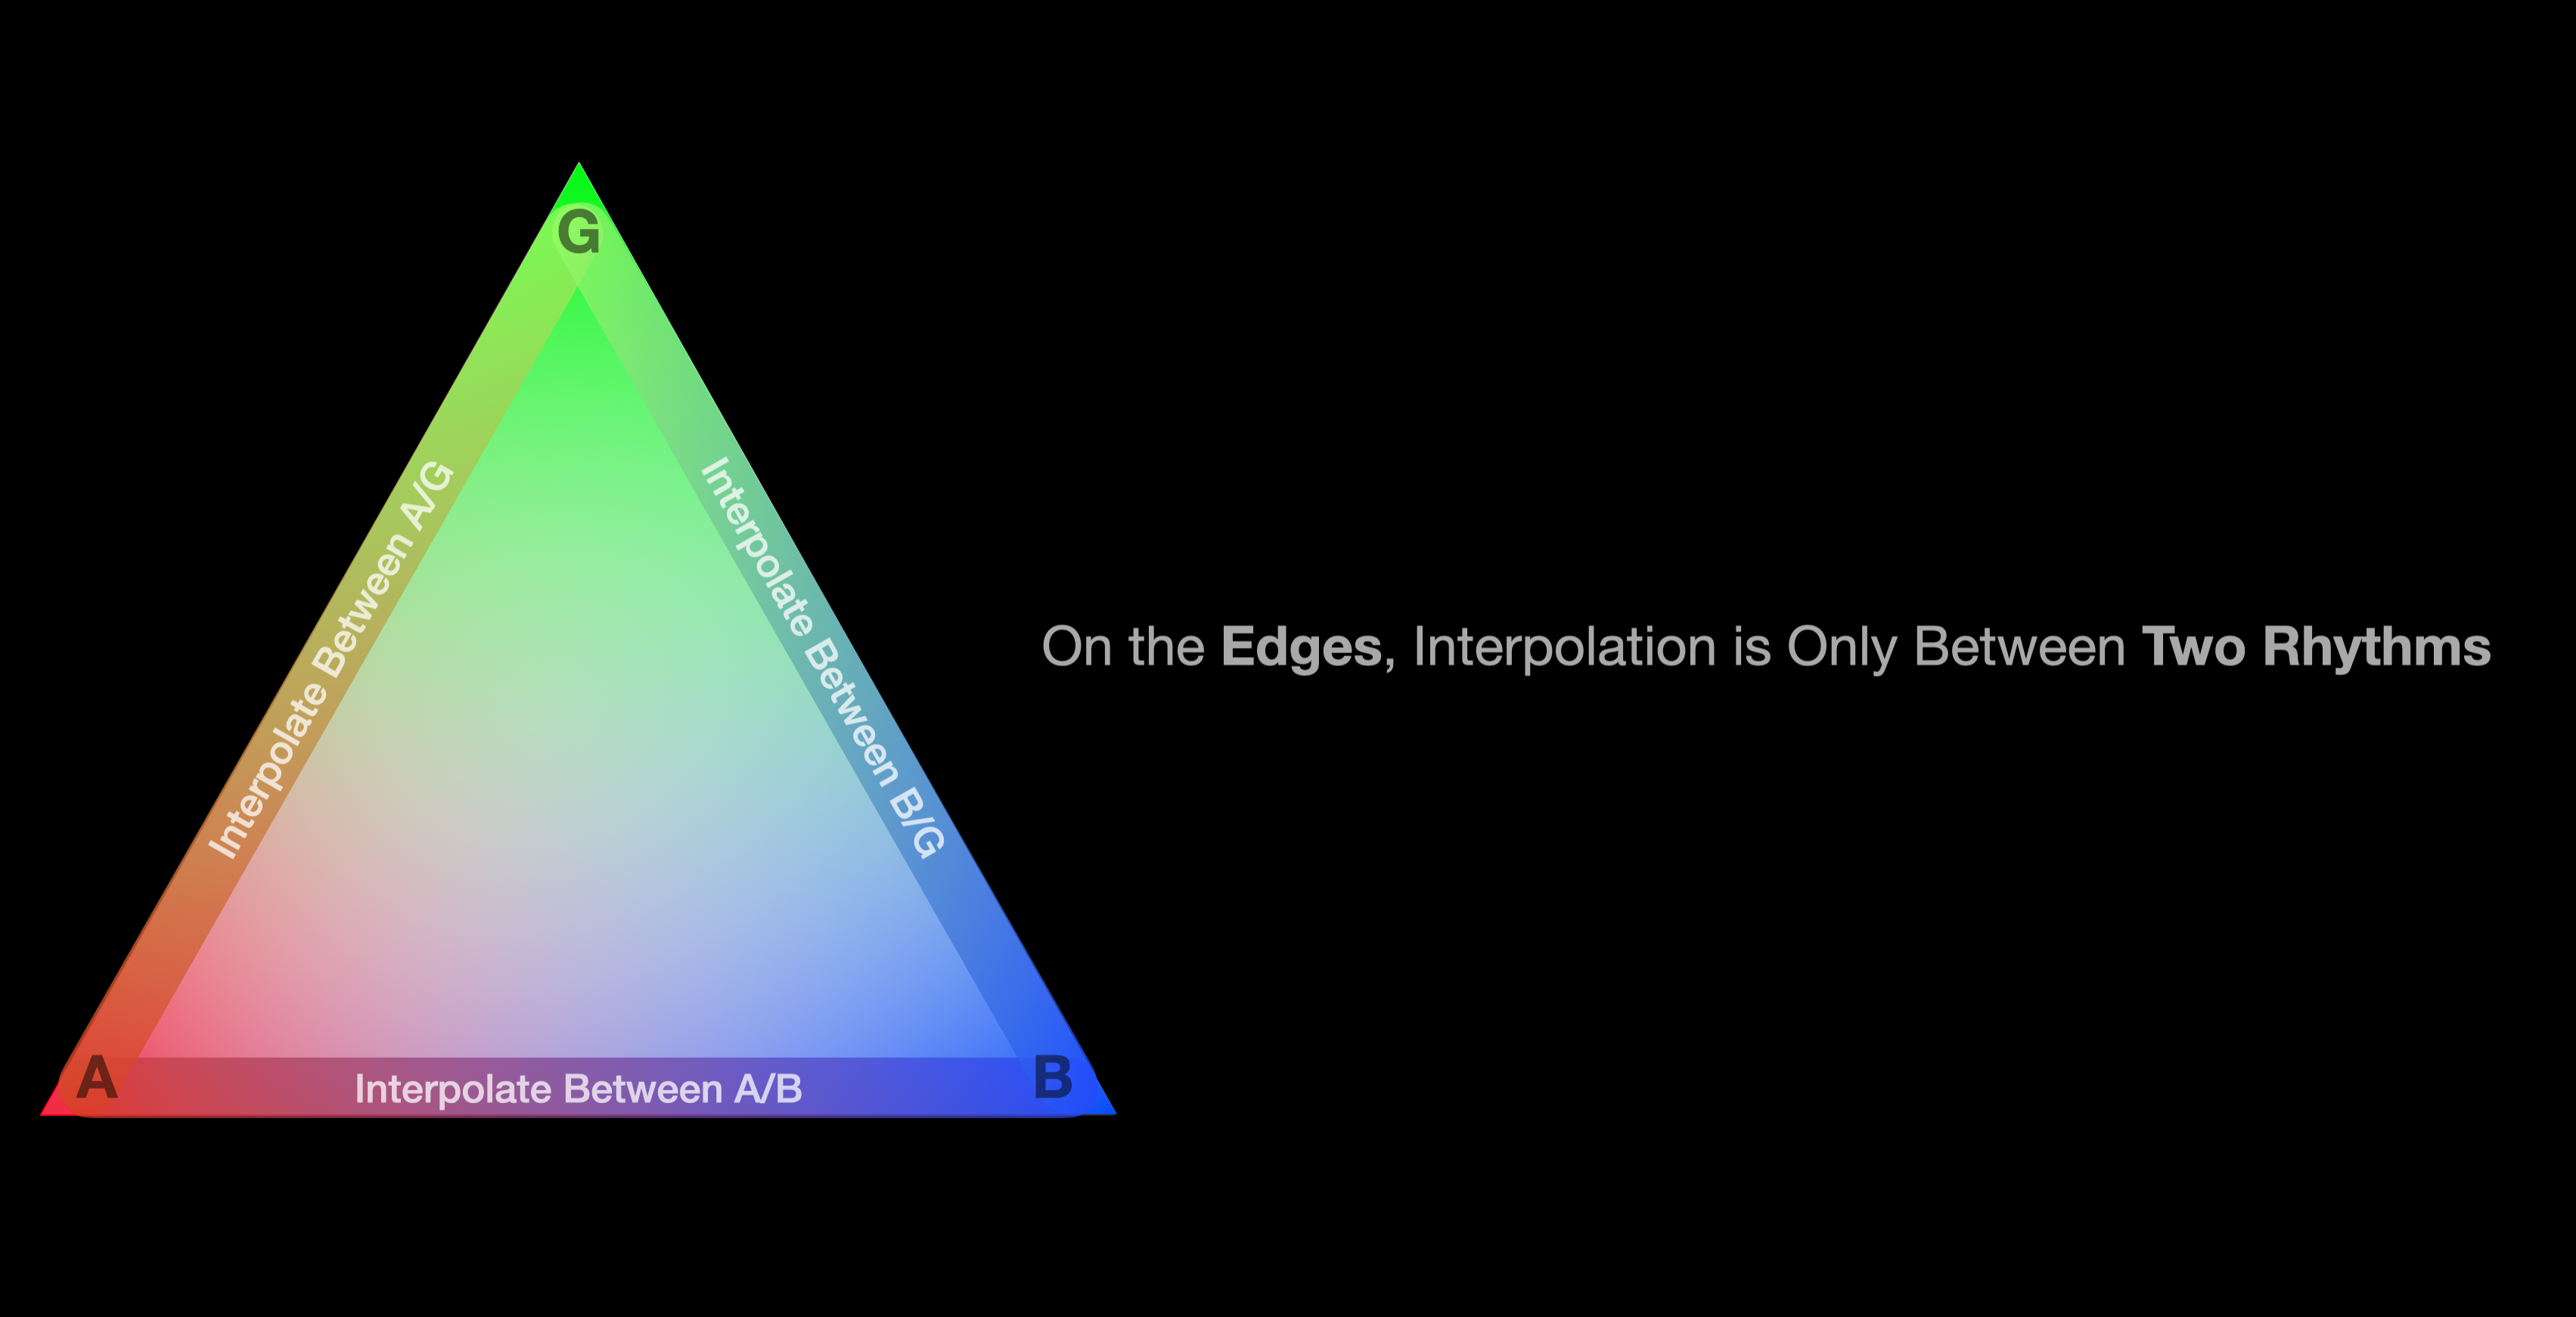
The introduction of the third pattern results in a triangular space, where the user can navigate between the three patterns.
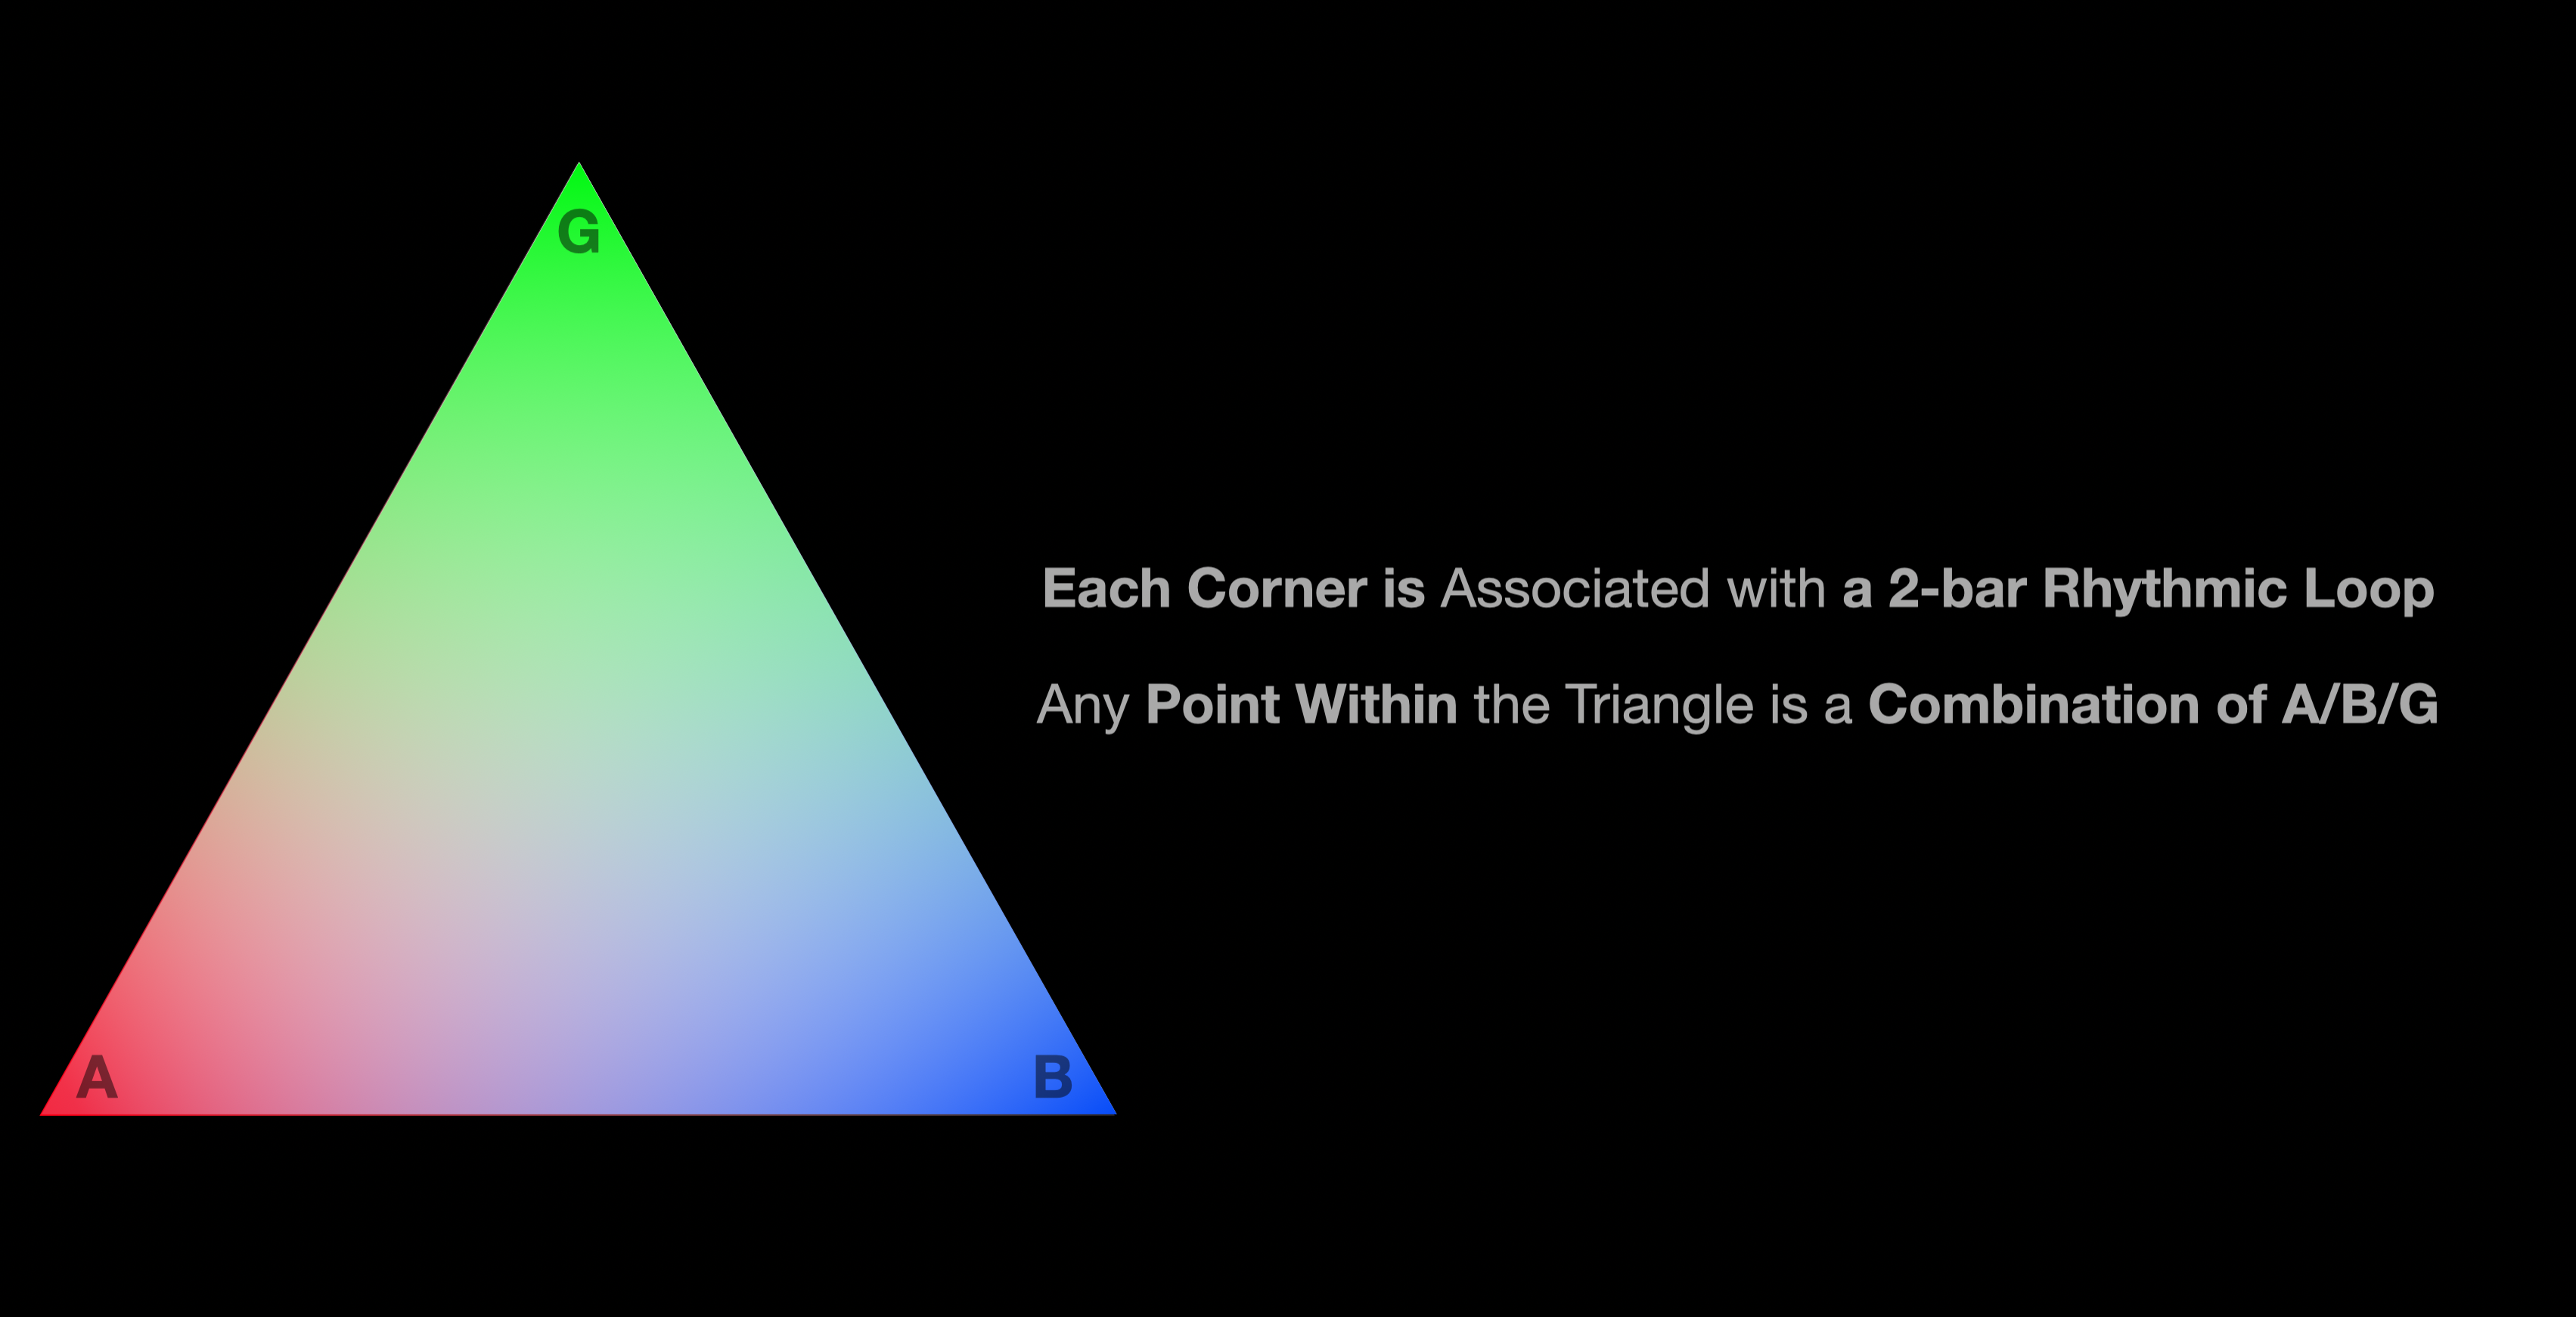
In this space, each region will have varying degrees of influence from the three patterns, A, B, and G.
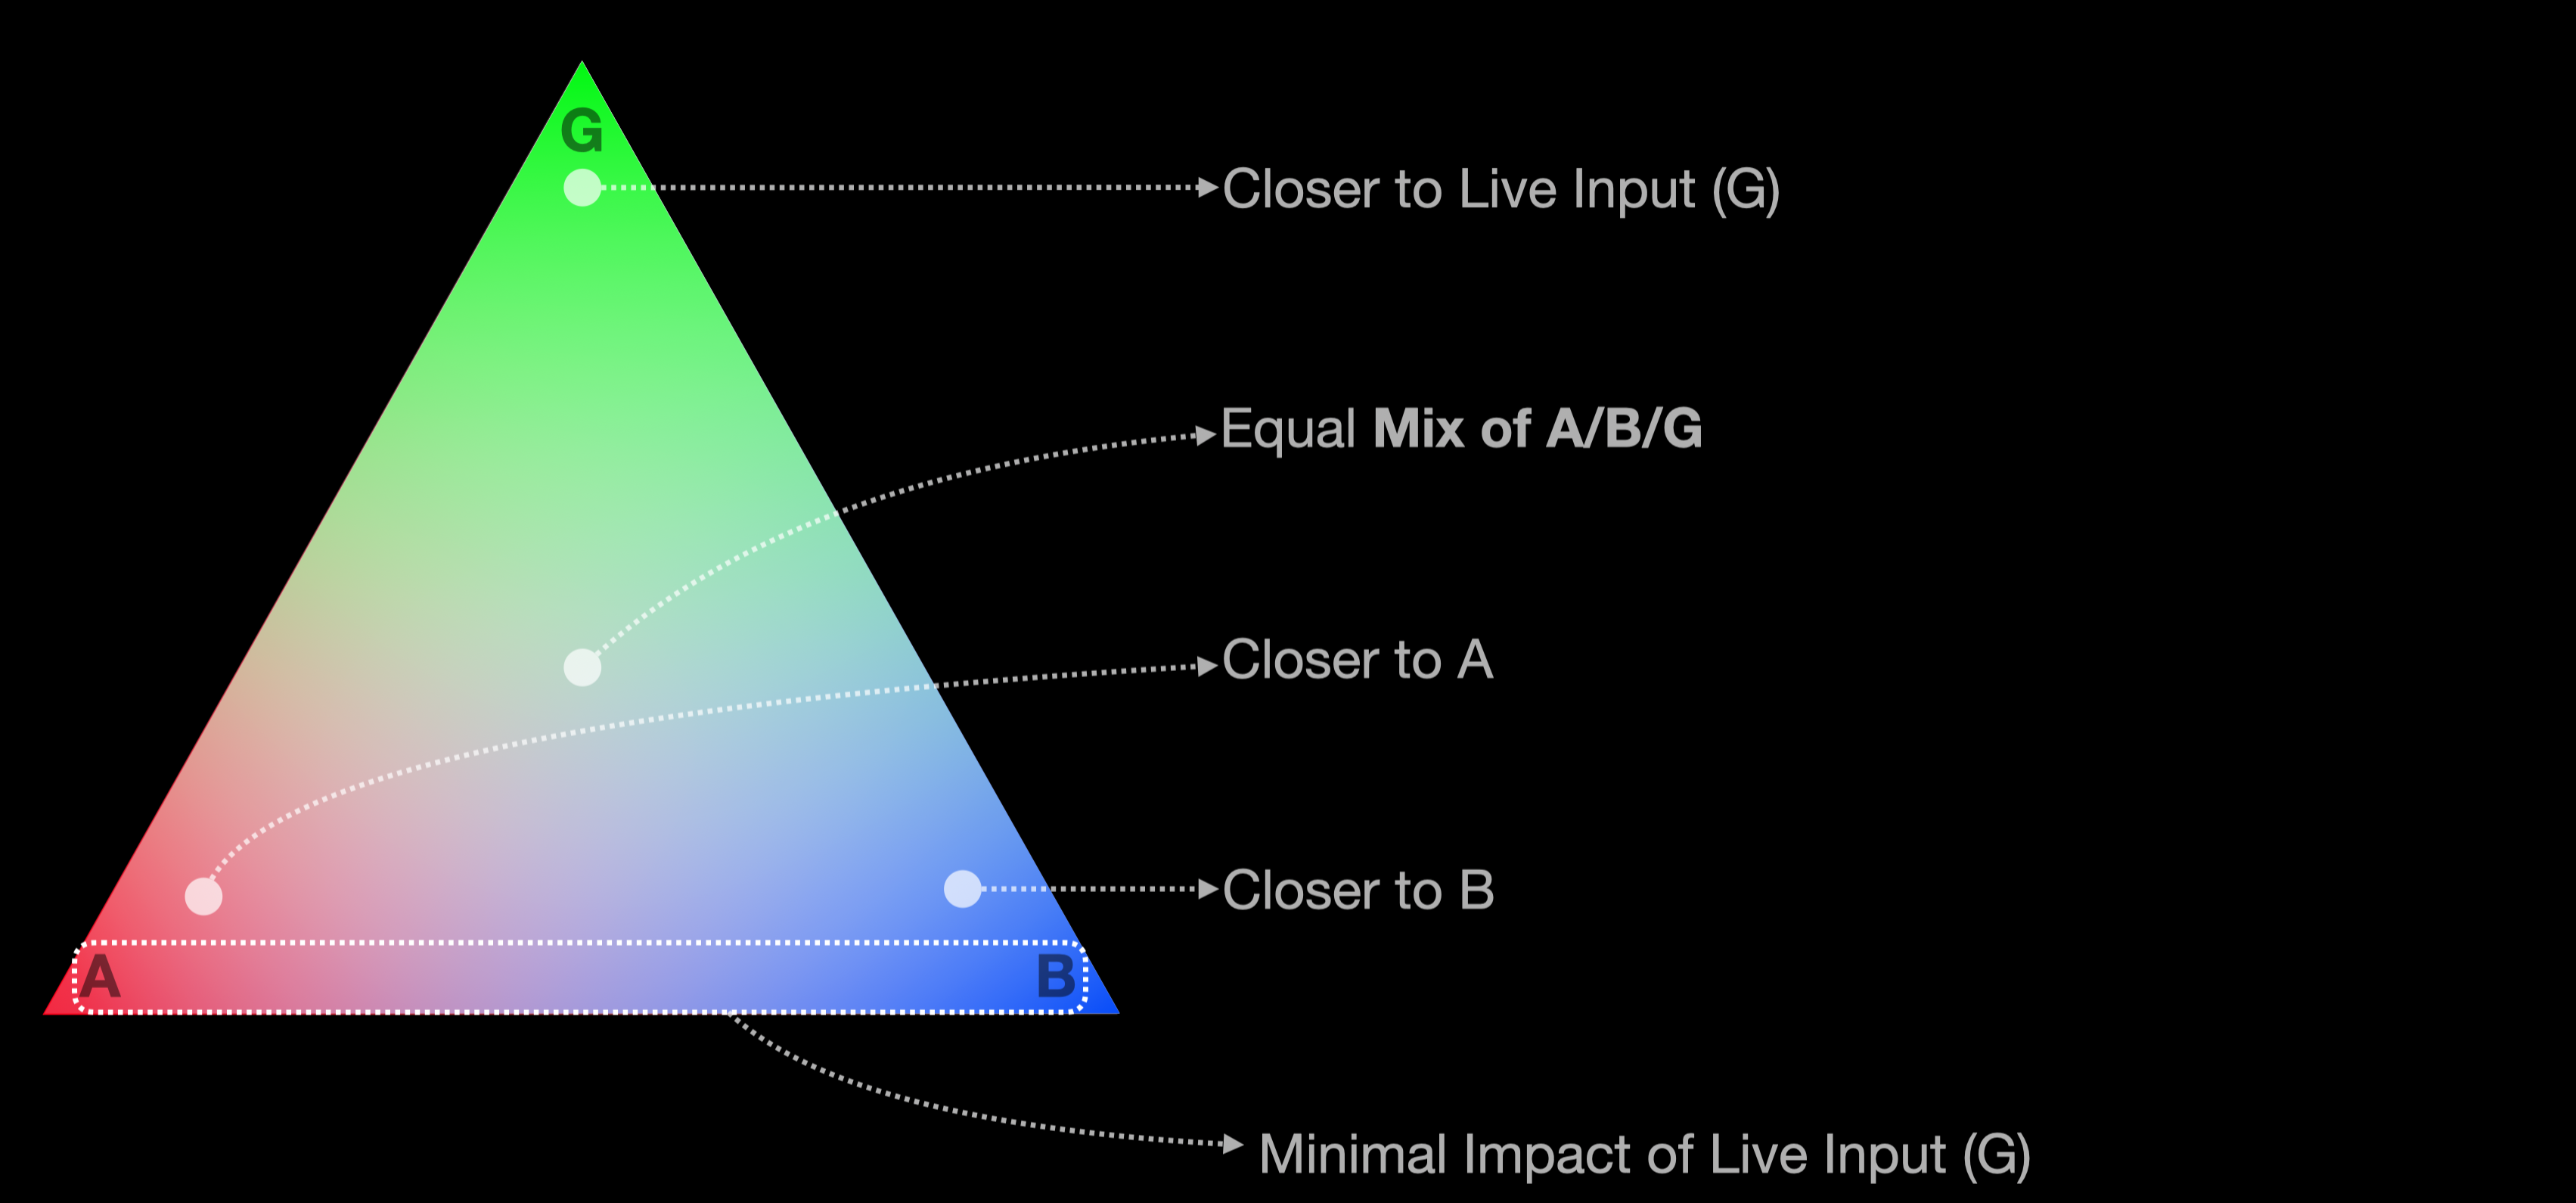
What’s interesting is that at the edges of the space, only two of the three corner patterns will be influential, hence allowing the user to not only modify the generations but also dynamically modify the role of the system in the performance. That is, to decide whether the system should be a sequencer, an accompaniment generator, or a hybrid of the two!
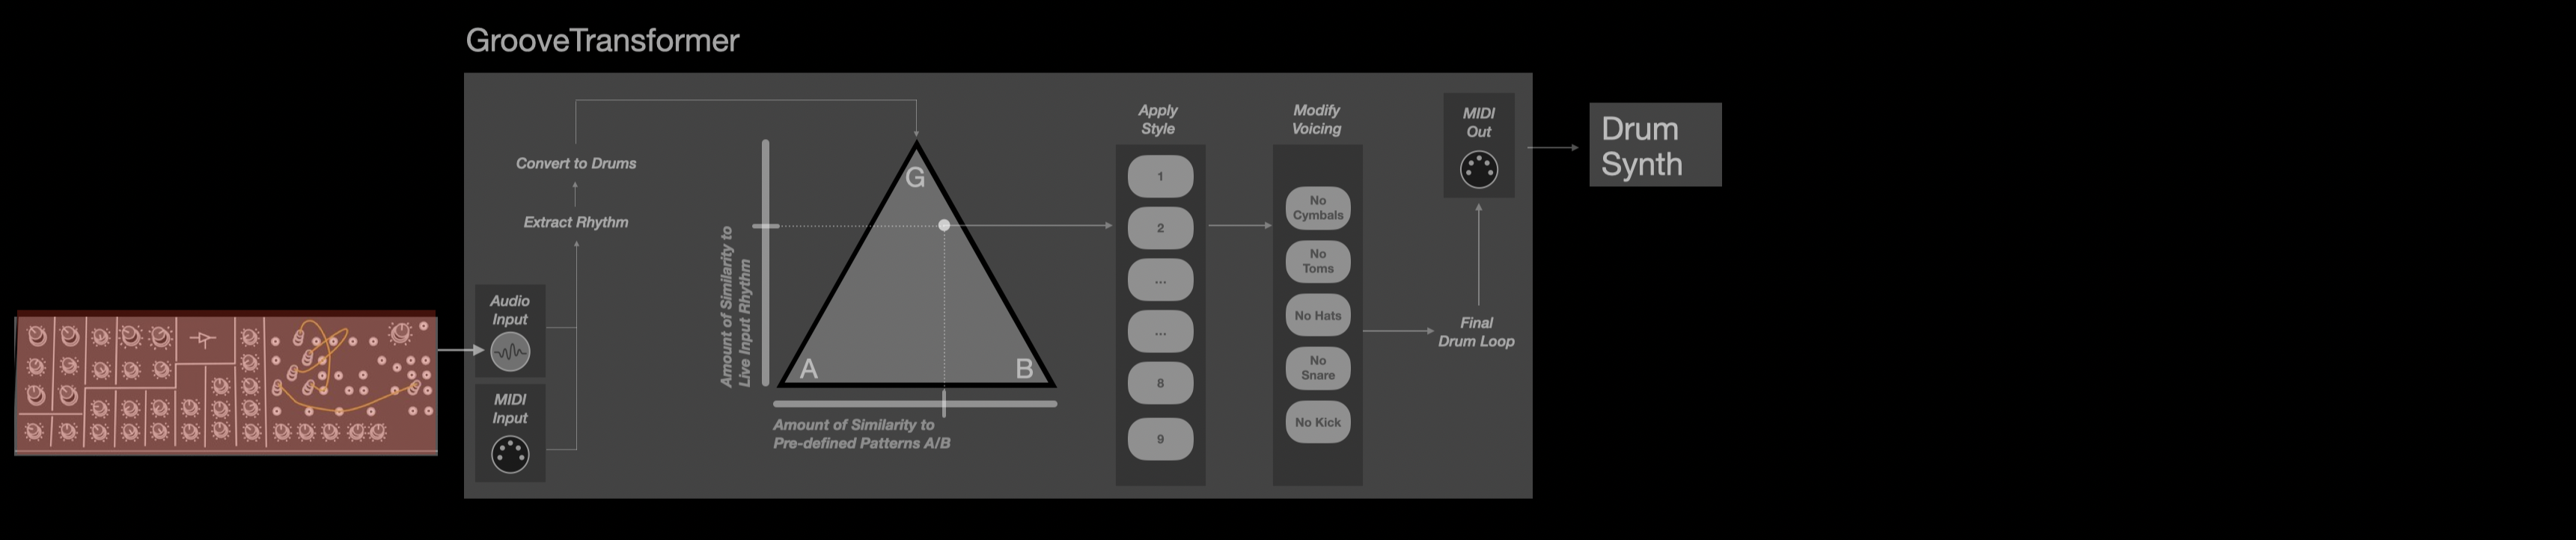
Where does the Live Rhythmic Source come from?
The model was trained on rhythmic patterns that were extracted from drum patterns. This means that the model is first and foremost trained on rhythmic patterns that are “drum-like”.
That said, in reality, we can extract this rhythmic pattern from any source, such as a drum loop, a melody, or even a speech!
While trained on MIDI sequences, we have external processes that allow for automatic extraction of rhythmic patterns from audio sources.
Keep in mind that the rhythm extraction from audio sources is not perfect, and it works best with very transient (percussive) sources.
Manual or Automatic Navigation
During the performance, the user can manually navigate the space, and the system immediately reacts to the movement.
We also have implemented mechanisms that allow for automatic navigation of the space, in case the user desires to focus on other aspects of the performance.
In this case, the system will automatically interpolate between the three patterns, A, B, and G, based on a set of rules that are implemented in the plugin.

Manipulating the Generations
One of the most interesting aspects of the plugin is that the user can manipulate the generations in real-time.
This means that for any given point in the space, the user can modify/re-render the drum loop, using a number of controls that are available in the plugin.
A set of “style” buttons allow manipulation of the overall velocity/timing/density of the drum loop.
Also, a separate set of controls allow for quick manipulation of voicing of the generations, while trying to keep the overall feel of the loop.
We’d love to hear your thoughts on the system, and we are always open to suggestions on how to improve the system! Please feel free to reach out to us!
Table of contents
- GrooveTransformer as a Sequencer
- GrooveTransformer as a Pseudo-Autonomous Rhythm Generator
- Advanced Use Cases: Going beyond Generating Percussive Sequences
GrooveTransformer can be used either as an instrument on which you perform (i.e. a sequencer), a (pseudo-)autonomous rhythm generator, or anything in between.
Below are some examples of how you can use the GrooveTransformer VST in different scenarios.
The following are just a few examples of how the GrooveTransformer can be used. We are interested in hearing about your use cases and how you use the GrooveTransformer!
GrooveTransformer as a Sequencer
Basic Operation Using A/B Patterns
{: .hint}Refer to Documentation to see how A/B patterns can be programmed.
The simplest way to use the GrooveTransformer is to use the A/B patterns to switch/morph between two different grooves, while also manipulating the generation parameters in real-time.
In the following example, we simply morph from pattern A to pattern B.
Groove Input Along with A/B Patterns
As mentioned before, GrooveTransformer can also receive rhythmic inputs in real-time, both from Audio and MIDI sources. This allows the sequencer to not only be controlled by you, but also allows it to react to an external rhythmic source.
The external sources can be anything from loops, other sequencers, or a live performance on an acoustic/digital instrument. Again, all of these can be in audio or MIDI format.
In the following example, we have a bass sequence (MIDI) and a drum loop (audio) that we constantly feed to the plugin. During the performance, we control the plugin by navigating the triangular area.
Let’s make this a bit more interesting. In the following example, we have a few drum loops fed to the GrooveTransformer. We also have two patterns stored in the A/B slots. This time, during the performance, we not only navigate the triangular area but also change the patterns in real-time using the voicing controls.
Ok! Let’s take it up a notch. So far, we’ve been using the generations to trigger drum samples. While designed to generate drum patterns, we can use the generations to trigger any kind of sample!
In the following example, we feed a few drum loops to the GrooveTransformer, and we use the generations to trigger two separate sample kits, one containing hand percussion samples and the other containing audio samples that are not necessarily percussive. During the session, we navigate the triangular area and change the patterns in real-time using the voicing controls.
[TBD INSERT SESSION OVERVIEW]
What’s worth noting is that so far, we’ve only used mainly percussive sources as inputs. In the case of audio, the GrooveTransformer can also be used to generate accompaniments for melodic instruments as well, that said, depending on the texture and the complexity of the audio, the results may vary. Specifically, for sounds with slow attack times, the GrooveTransformer may not be able to capture the rhythmic content accurately (or at all). In the following example, we feed non-percussive audio to the plugin and perform on the sequencer same as before. Note that only some of the audio events can be detected by the GrooveTransformer, and the rest are ignored.
[TBD INSERT SESSION OVERVIEW]
So far, on the input, we’ve been using audio/midi sources that were part of the performance (i.e. synthesized). One trick we can do is to feed a looping MIDI groove to the plugin, without synthesizing any sound from it. This way, the top corner will also be associated with an “artificially static” groove, and hence, we can perform the sequencer using three “static” patterns, rather than two.
In the following example, we start from A, morph to B, and then to morph to G (fed with a looping MIDI sequence that is not synthesized). Note that, the pad sounds you hear in this example are not fed to the plugin and are just being played for the sake of the performance.
[TBD INSERT SESSION OVERVIEW]
GrooveTransformer as a Pseudo-Autonomous Rhythm Generator
As mentioned in the documentation, there are a number of ways to enable the GrooveTransformer to self-navigate the triangular area.
If this feature is enabled, then the GrooveTransformer can be used as a pseudo-autonomous rhythm generator.
We call this pseudo-autonomy because we are using some basic rules to navigate this space, hence there is no actual decision-making involved!
In the following example, we don’t interact with the plugin directly, except for controlling what is being fed to the input. Specifically, we have some looping patterns prepared; during the performance, we mix between them and feed them to the plugin. The plugin then generates the accompaniment based on the input and we synthesize the output accordingly.
[TBD INSERT SESSION OVERVIEW]
Alternatively, we can allow the plugin to play a pattern and we can start jamming on top of it, using any instrument we like. Below is an example of how we can use the GrooveTransformer as a pseudo-autonomous rhythm generator, while we play a pattern on an external synthesizer.
The performance on the external instrument is not limited to performing the keys! In the following example, we are sequencing the external synth and play with the synthesis parameters in real-time.
Advanced Use Cases: Going beyond Generating Percussive Sequences
Parameter Sequencing using Velocity of Generations
Instead of using it as a trigger sequencer, we can use it to sequence parameters of a synthesizer using the velocity of the generations! In the following example, we have prepared a virtual modular patch (in VCV Rack) that uses the velocity of the generations to modulate some parameters of the Mutable Instruments Plaits module.
[TBD INSERT SESSION OVERVIEW]
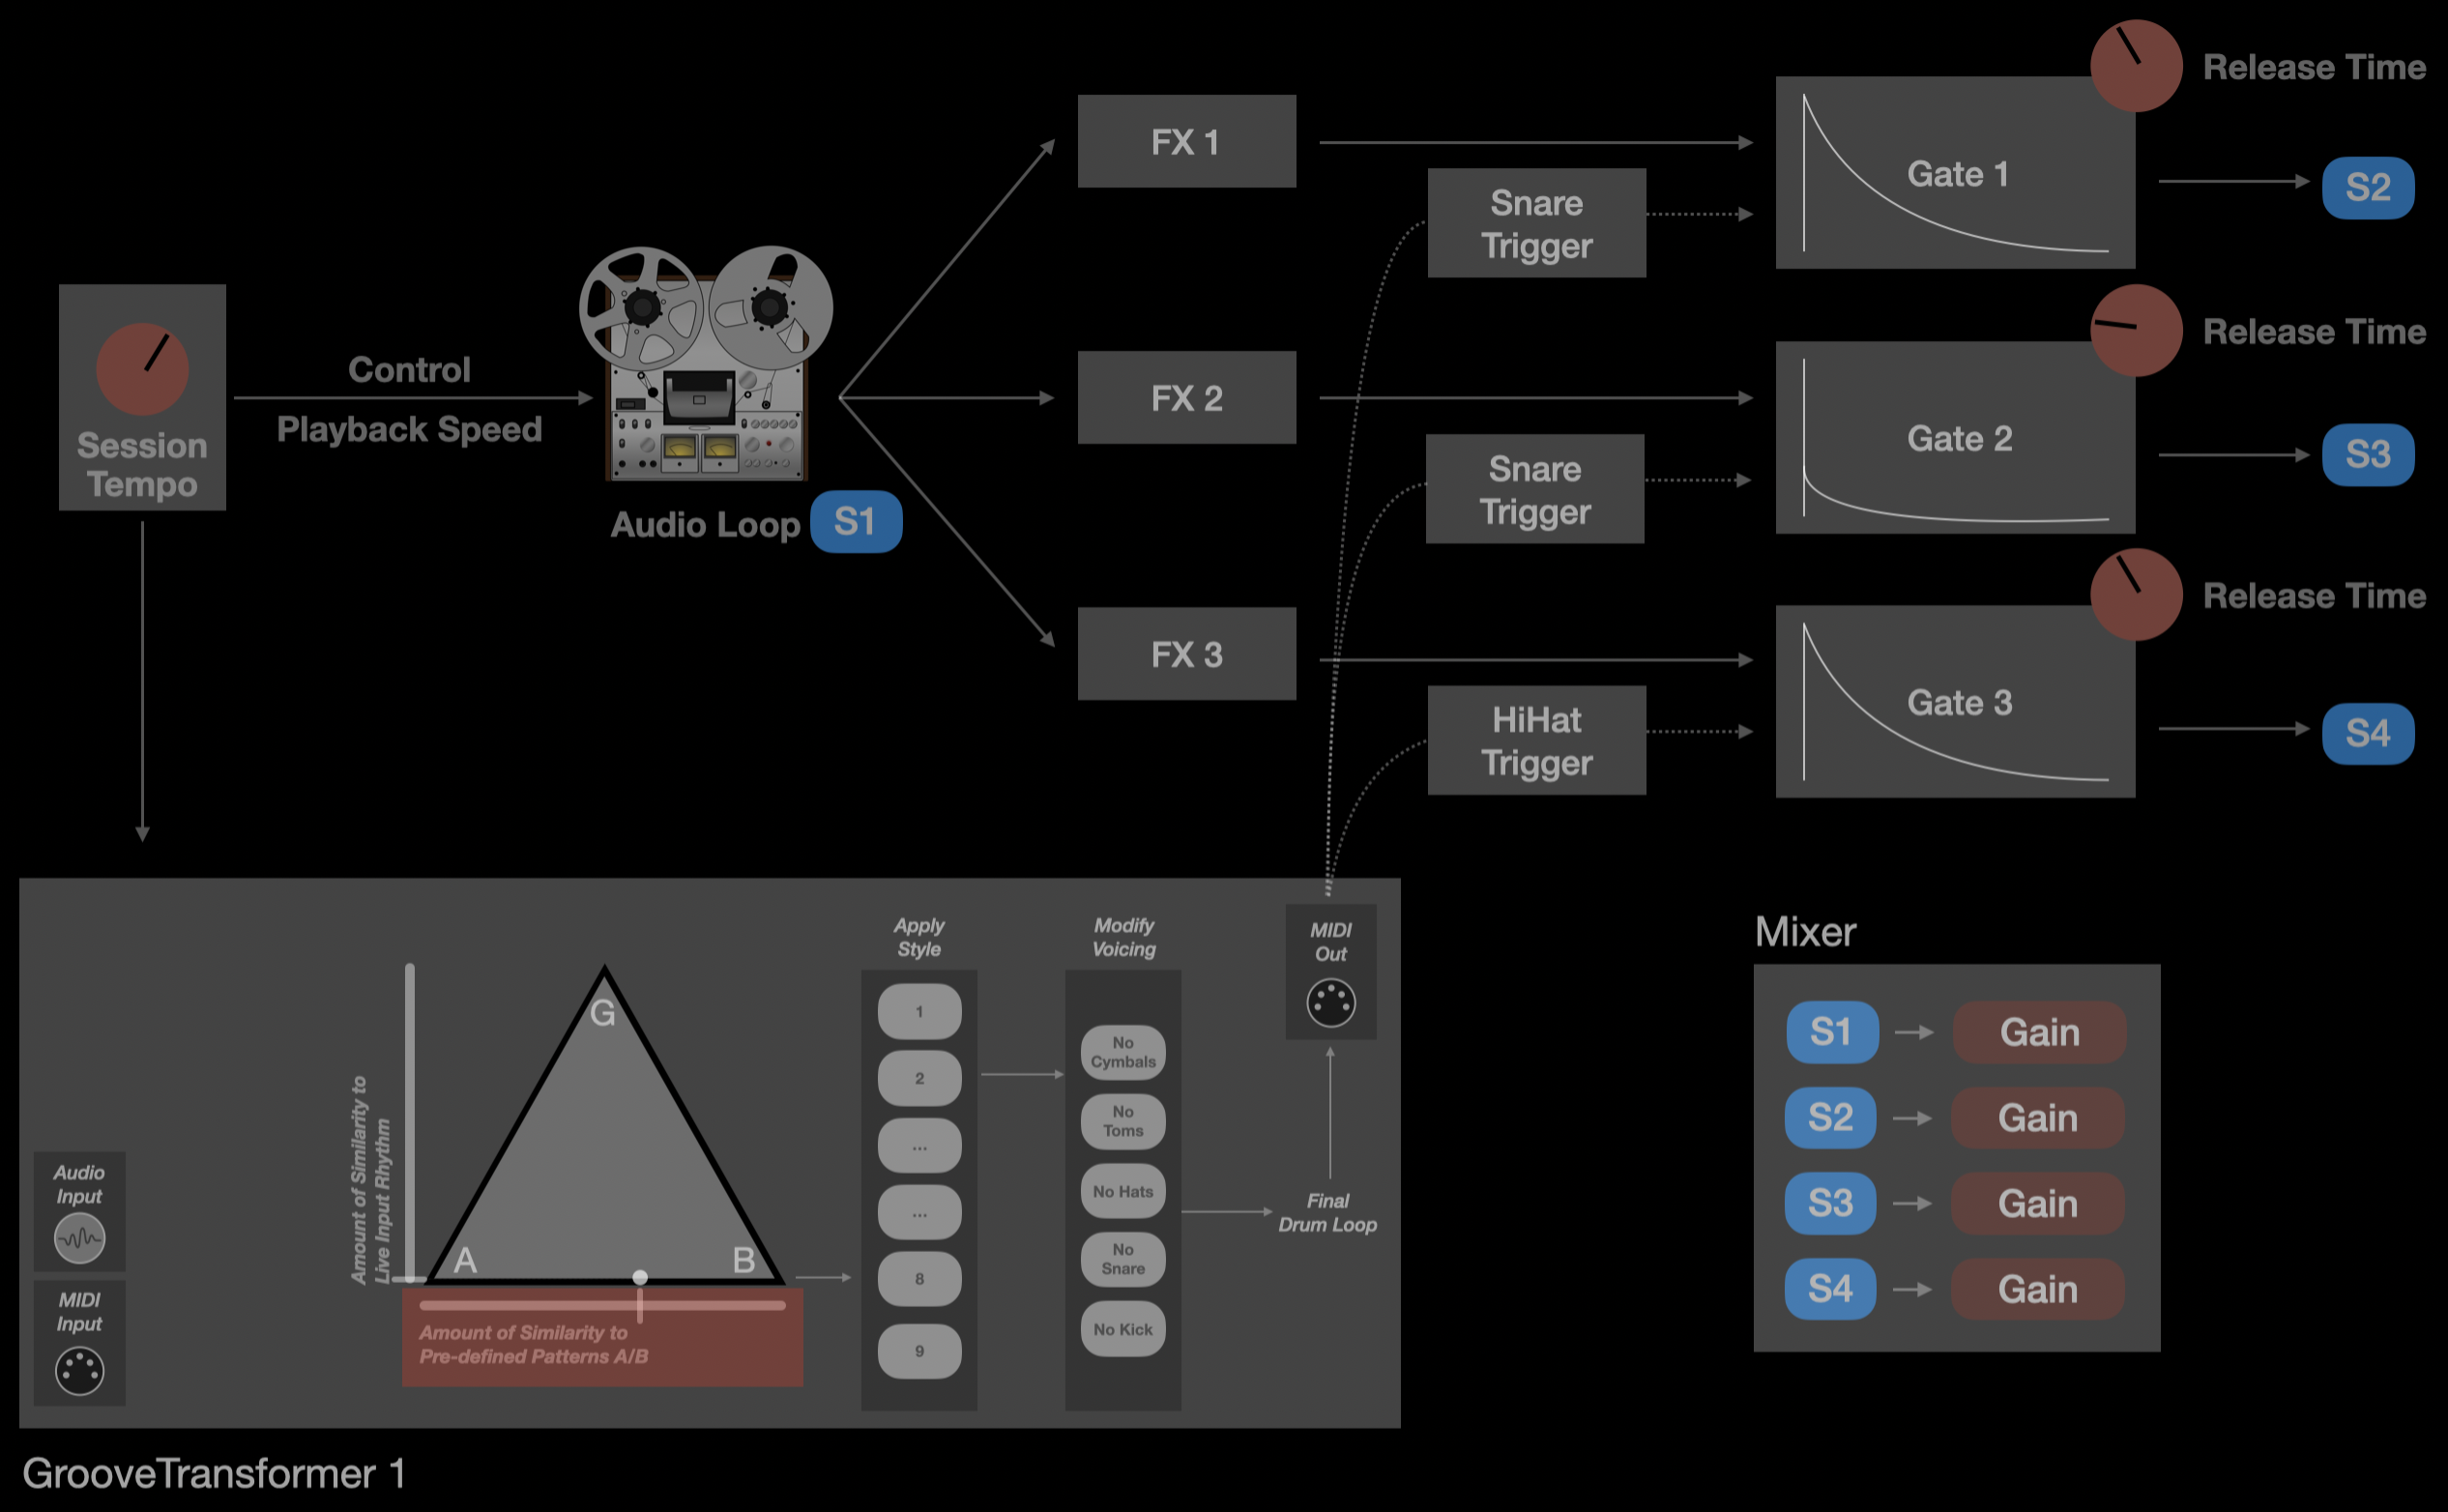
Rhythmic Manipulation of Audio
So far, we used the plugin to trigger sounds or modulate parameters of a synthesizer. However, we can also use the GrooveTransformer to manipulate audio in real-time.
For this, we need to make custom processing chains that can take the output of the GrooveTransformer and manipulate it in real-time.
In the following example, we have a custom patch in VCV Rack that takes the output of the GrooveTransformer and uses the trigger/velocity of the generations to activate three voltage-controlled amplifiers (VCAs). Each VCA is connected to a different audio source, and the output of the VCAs is mixed together.
Multiple Instances of GrooveTransformer
Moreover, we can use multiple instances of the plugin each for a separate purpose. For example, we can use one instance of the GrooveTransformer to generate a drum pattern, and another instance to manipulate audio in real-time.
Pitch Sequencing
While the plugin is designed to generate percussive sequences, we can also use it to generate melodic sequences. For this, we need to use the plugin in conjunction with a synthesizer that can generate pitched sounds. Also, we need to potentially use external MIDI processing to map the output of the GrooveTransformer to the pitch of the synthesizer.
In the following example, we use three instances of the GrooveTransformer to generate three different pitched sequences. The pitch of the generated sequences are all modulated randomly or via a MIDI controller, and the modulated pitch is then passed through a quantizer.

Table of contents
Setup in DAW
As of VST3, there is no MIDI-only plugin type, there are all only instrument or audio effect plugins.
GrooveTransformer has been designed as an audio effect plugin, despite the fact that it does not process audio.
This means that you will need to route MIDI/Audio to the plugin. Below is a quick guide on how to set up GrooveTransformer in your DAW.
If you place GT on a MIDI track, you can only route MIDI into it, but if you place it on an audio track, you can route both MIDI and audio into it.
In Ableton Live, the best way to set up GrooveTransformer is as follows:
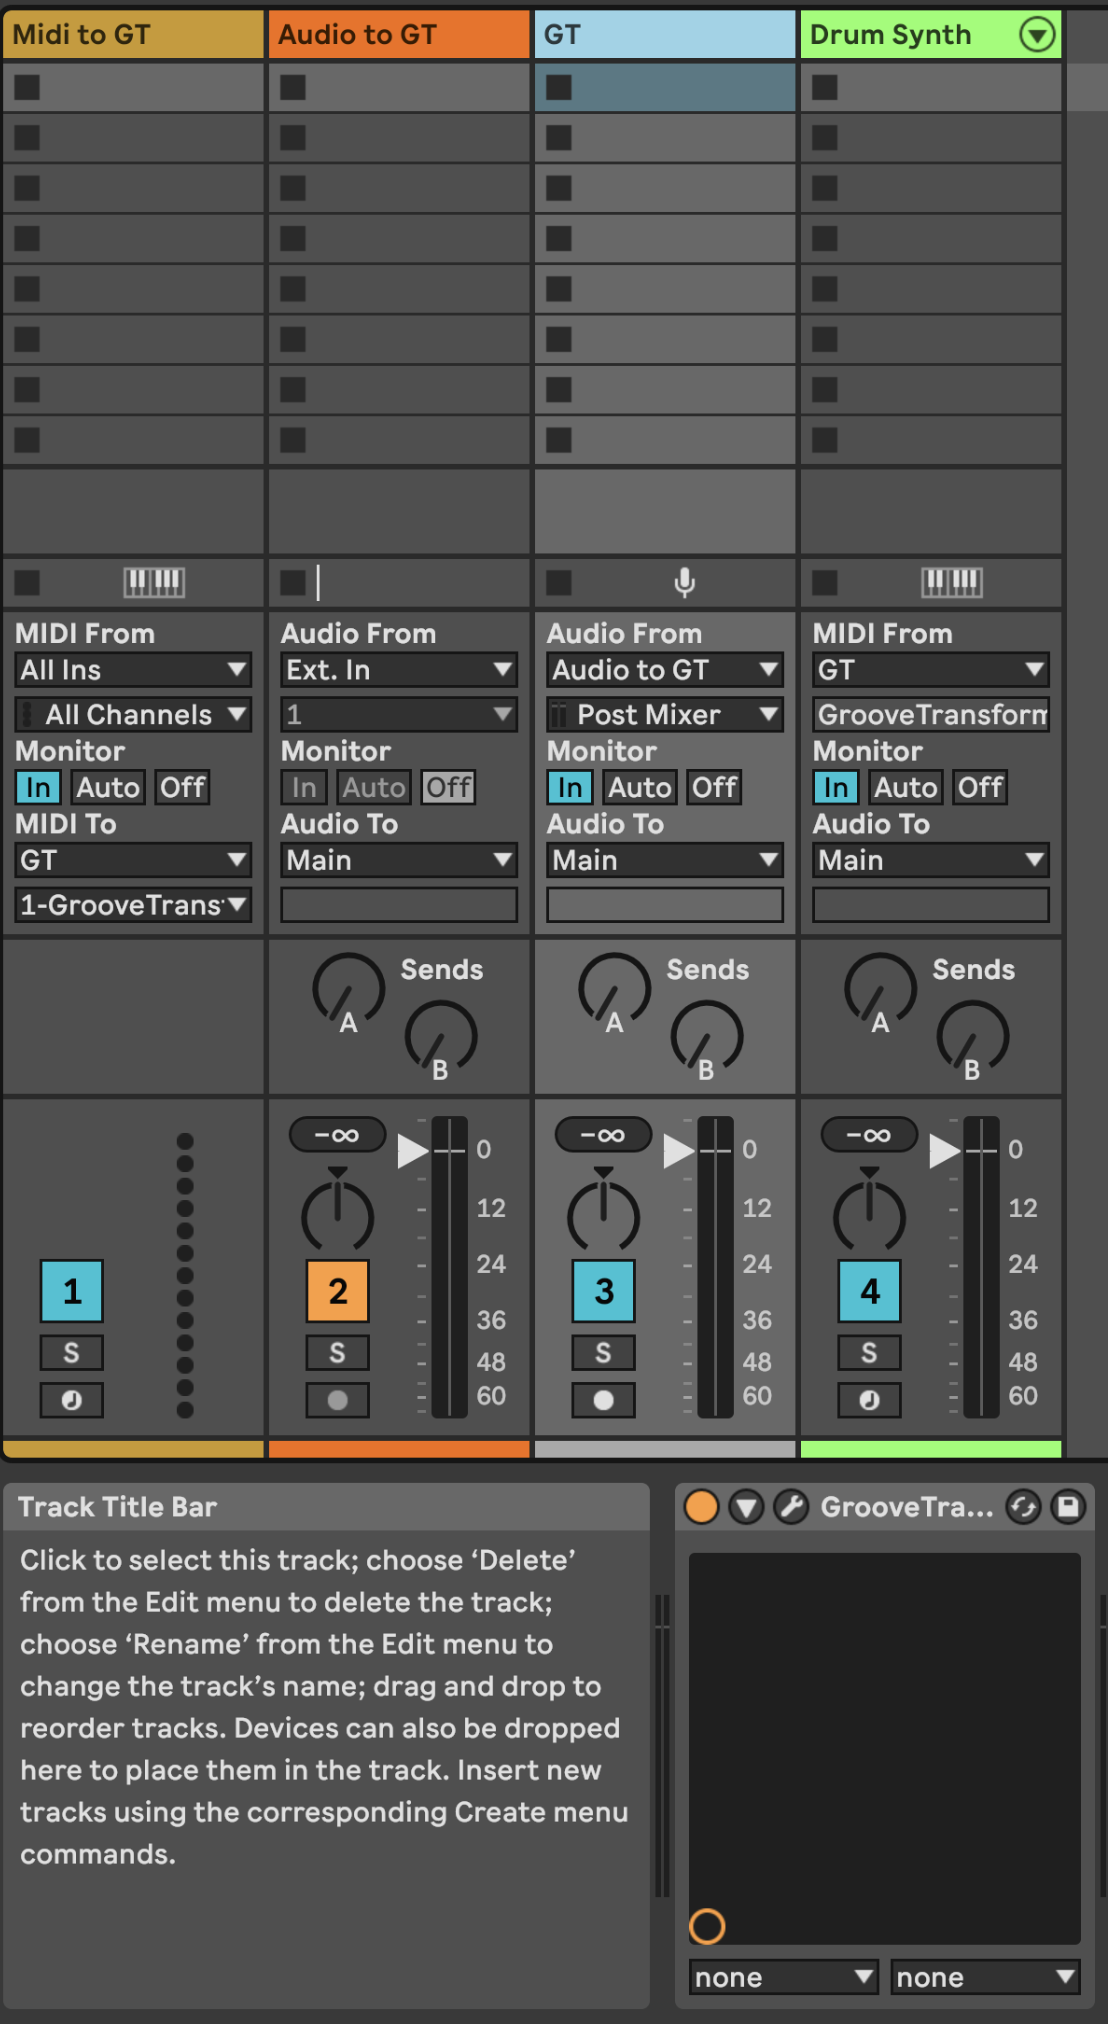
The above setup allows to route both MIDI and audio into GrooveTransformer.
The plugin does not pass audio through it, so do not place it on a track where you want to process audio.
Manual (Version 0.0.1)
Below is a detailed description of the GrooveTransformer module.
When hovering the mouse on any control parameter of the plugin, a brief description of the control shows up at the bottom of the plugin.
Feeding a Live Rhythm to GrooveTransformer
As shown in the setup above, the first track receives MIDI and routes it into GrooveTransformer. Moreover, the GrooveTransformer is always “listening” to the audio coming out of the second channel.
The live rhythm can be in any form you desire, that is it can come from pre-programmed MIDI clips, a live performance on a MIDI controller, a pre-recorded audio loop/track, or a live audio input.
- In case of audio, the plugin tries to detect the transients into rhythmic information. This is not perfect and may not work well with all types of audio. This detection is quite sensitive to the volume of the audio stream and the timbre/attack of the sounds in the audio stream.
- Audio detection only works if the host’s sample rate is 44100 Hz. If the sample rate is different, the plugin will not detect audio.
- The plugin registers the events with respect to a 32-step 16th note grid (i.e. 4/4 time signature with 16 steps per bar). As a result, initially to understand the behaviour better, maybe it’s best to synchronize with the internal clock of the DAW using a click track.
Manipulating the Detected Rhythmic Events
The input rhythmic events are extracted and placed in a 32-step 16th note grid, visible in the top section of the plugin.
This input “buffer” works in an overdub fashion, meaning that the incoming events are added to the buffer, and the buffer is not cleared until the user clears it, or after a certain number of bars specified by the user (Slider left of the looper).
Moreover, there is an “Adaptive Memory” button that, if enabled, will automatically decide how long the events should be kept in the buffer. If a lot of notes are coming in within a short time, the buffer will be cleared faster, and if the notes are sparse, the buffer will be cleared slower.
If you want the plugin to only react to the latest 2-bar rhythm, disable “Adaptive Memory” and move the slider to the lowest value.
The velocity of the registered events can be adjusted using the “Groove Velocity” slider. In the middle, the velocity is kept as is, moving to the upper side increases the velocity, and moving to the lower side decreases the velocity.
The micro-timing of the events can be adjusted using the “Groove Timing” slider. In the lowest position, the micro-timing is kept as is, while moving towards the upper side, moves the events closer and closer to the grid. That is, at the highest position, the events are quantized to the 16th note grid (i.e. no micro-timing).
When saving a preset, the input buffer is not saved. This is to ensure that the user can start fresh with a new rhythm when loading a preset.
If a preset is changed during a performance, the input buffer is kept as is (although the controls may change depending on the preset).
The input buffer is cleared when the plugin is turned off. This has been a deliberate design choice to ensure that the top corner is always associated with a live incoming rhythm.
Selecting A/B Patterns
There are a number of ways to select the A/B patterns:
Randomization: Press the “Dice” button to randomize the A or B pattern. When auditing the A/B patterns, ensure that the playback position is at the corner where the A/B patterns are being randomized.
Snapping to A/B Patterns: Next to each corner, there is a snap button (shown with a paperclip icon). Pressing this button will snap the current playback rhythm to either of the A/B slots. This is useful when you want to save a rhythmthat you like. Note that as soon as snap is pressed, the rhythm is saved in the respective slot and the playback position is moved to the corner at which the snap was pressed.
Programming via a Groove: As mentioned before, the top point corresponds to the live incoming rhythm. This means that, placing the playback at the very top, you can a feed a live rhythm into the plugin and listen to the generation. Whenever you like the generated rhythm, you can snap it to the A/B slots.
Navigation of the Triangular Rhythm Space
Manual Navigation: The most straightforward way to navigate the triangular rhythm space is by manually moving the playback position within the triangular area. This is done by either clicking anywhere within the triangular area or by dragging the playback position.
Navigation Via Host: The triangular area is controlled using two parameters called Interpolate</uand Follow. These are exposed to the host, so you can either map these to a controller, automate them, or use modulation sources to control them.
Oscillating between A/B: You can find a slider below the triangular area called AB Oscillation Rate. When moved anywhere but the very left, the playback position will oscillate between the A and B patterns at the specified rate. This is similar to modulating the Interpolate</uparameter externally from the host.

Adaptive Follow: A button called Adaptive Follow</uis provided to automatically adjust the Follow</uparameter based on the incoming rhythm. The way it works is that as the groove becomes more active (dense), the playback position moves more and more towards the top of the triangle. The highest point reached by the playback position is determined by a slider called Max Follow, placed below the Adaptive Follow button.
The combination of Adaptive Follow, Adaptive Memory, and AB Oscillation can lead to full autonomous navigation of the triangular rhythm space.
While Adaptive Follow and AB Oscillation are engaged, the user can still manually navigate the triangular rhythm space. The manual navigation will override the automatic navigation and automatically disengage the Adaptive Follow and AB Oscillation Rate.
Manipulation of Generations Using Controls
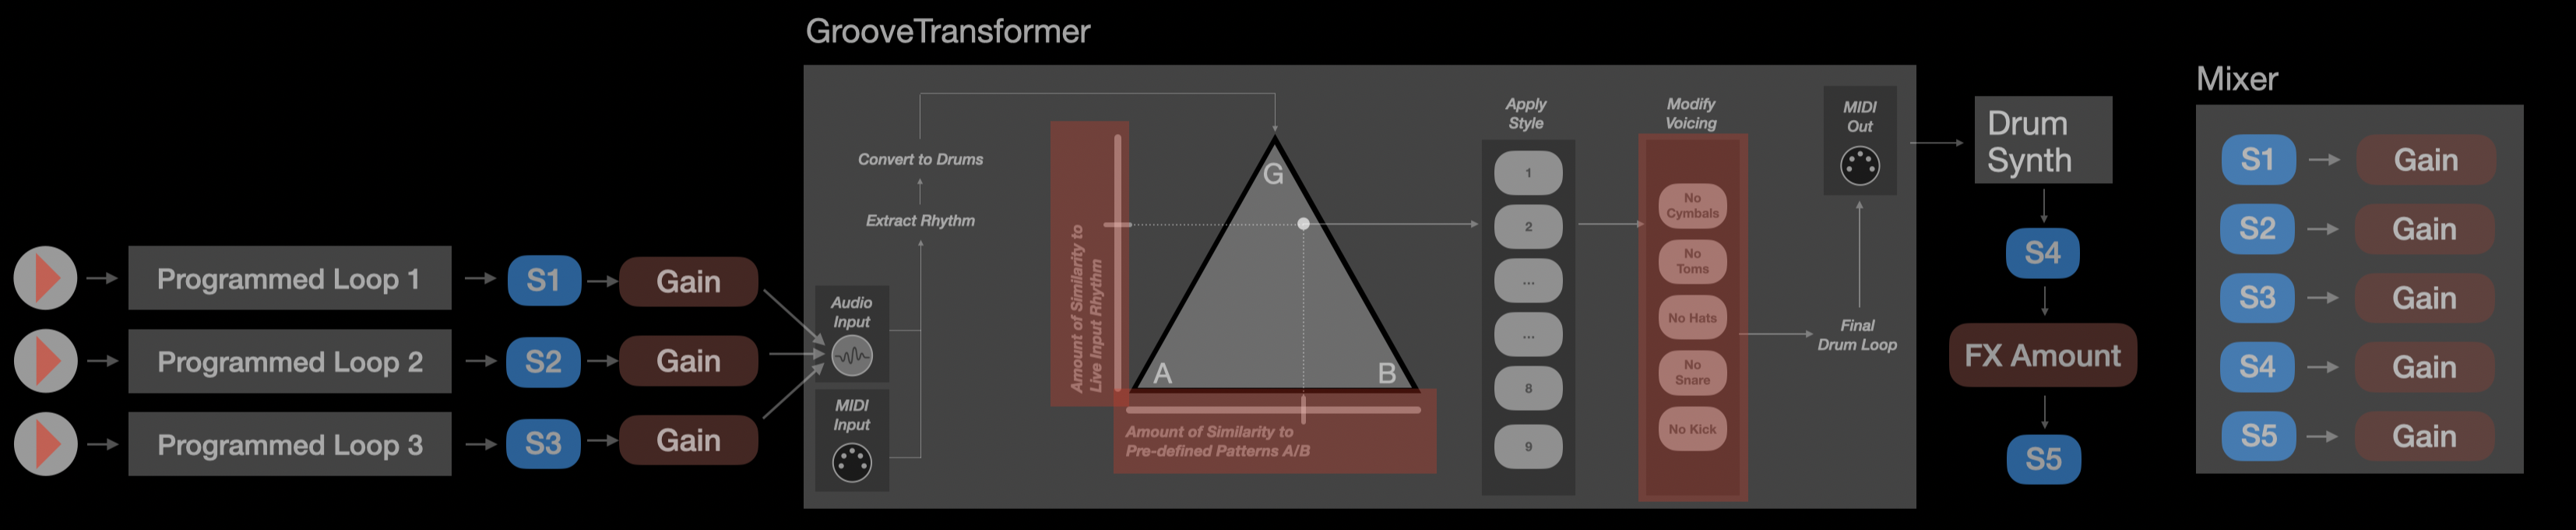
Style Templates: The plugin comes with 9 style controls that can be used to manipulate the generated rhythm. We intentionally did not name these controls to promote experimentation, rather than imposing the notion of what style the performance should stick to! The style templates manipulate the generated patterns in terms of velocity, timing, voice density, and voice distribution. Hence, they can quite drastically change the feel of the generated rhythm.
Voicing: The voicing controls are used to manipulate the voice distribution of the generated rhythm. The 9-drum voices are grouped into 5 categories:
| Category | Drum Voices |
|---|---|
| Kick | Kick Drum |
| Snare | Snare Drum |
| Hat | Closed Hat, Open Hat |
| Tom | Low Tom, Mid Tom, High Tom |
| Cymbal | Crash, Ride |
For each category, the groups can be Muted</uor Redistributed.
Muting simply removed the drum voices from the generated rhythms while keeping the rest as is.
Redistribution, on the other hand, takes out the drum voices from the category and tries to render a new pattern that ideally “feels” the same however without the removed drum voices.

Redistribution is done using the generative model. As such, at times it may not work as expected!
Also, whether the redistributed pattern feels the same is also quite dependent on the synthesis
A Note on Style and Voicing Controls: These controls are applied globally, that is, all the patterns within the rhythmic space are modified using these controls. This was a deliberate design choice to ensure that the controls impact the immediate pattern, hence, being highly geared towards real-time performance.
Generation Quantization: The micro-timings of the generations can be quantized using the Generation Quantization slider placed in the bottom right corner of the plugin. At the very left, there is no quantization while at the very right all events are snapped to the 16th note grid (hence, no micro-timing).

Trying Model Variants
There are three model variants that can be used. These models have the same architecture, with different training schemes. It’s not necessary to go through the technical differences, but what is perhaps important is that the models were trained with the following aims:
| Category | Drum Voices |
|---|---|
| 0.2Beta | Trained for better conversion of live incoming rhythm into a drum pattern |
| 1.0Beta | Trained for better generation of random drum pattern patterns |
| 0.5Beta | Trained to be somewhere in between the above two |
Once a model is swapped mid-session, the patterns at A/B positions will be changed and will have no correlation with the previous patterns.
It’s not to say that you shouldn’t swap the model mid-session, just be aware of the behaviour!
If you are using the model only for accompaniment generation (i.e. playback is always at the very top), the generations will likely change, but will still be correlated with the groove buffer. Hence, in this case, it is “safe” to change the model.
Over the past year we’ve had two performances using the system:
Moreover, we also presented the GrooveTransformer at Sonar+D (2023) and +RAIN (2023) festivals.
Lastly, we also prepared an interactive installation for a six-month exhibition on Artificial Intelligence at CCCB, Barcelona (2023-24). In this exhibition, we prepared an interactive installation that used the generative models behind the GrooveTransformer.
The VST was developed using C++. If you are comfortable with C++ and the JUCE framework, you can use the source-code to modify/hack or build new modules:
https://github.com/behzadhaki/GrooveTransformerPlugin
That said, for those who are not familiar with C++ or JUCE, we are working on PureData and Max/MSP examples which will allow you to access the generations and build your own modules. Stay tuned for more information on this!
